Difference between revisions of "BSF Study Registration"
Jump to navigation
Jump to search
(Removed bold and add photo constraint) |
|||
| (15 intermediate revisions by one other user not shown) | |||
| Line 1: | Line 1: | ||
| + | == Step 1 of 6: Setup == | ||
| + | |||
To create a study, access the GIGPAD application and click on ''New Study'' that is under the ''Studies'' tab. | To create a study, access the GIGPAD application and click on ''New Study'' that is under the ''Studies'' tab. | ||
* Select the Facility and choose ''Biosample Services'' | * Select the Facility and choose ''Biosample Services'' | ||
* Click ''Next Step'' | * Click ''Next Step'' | ||
| + | |||
| + | [[File:1.png|700px]] | ||
When the page prompts you to the next step, continue with the following steps: | When the page prompts you to the next step, continue with the following steps: | ||
| − | + | ||
| − | + | == Step 2 of 6: Study Definition == | |
| − | + | # Enter the ''Study Name'', ''Study Description'', and select the ''Coordinator'' | |
| − | + | # Select any ''Associated Researcher(s)'' and add to this study | |
| − | * Click ''Next Step(Study | + | # Fill in the ''IRB Approval #'' and ''Start Date'' |
| + | # Click ''Next Step(Study Questionaire)'' | ||
| + | |||
| + | [[File:2.png|700px]] | ||
| + | |||
| + | == Step 3 of 6 Study Questionnaire == | ||
| + | This is the ''Study Questionaire'' page, fill in all of the required information. | ||
| + | Click ''Next Step(Default Sample Annotations)''. | ||
| + | |||
| + | [[File:3.png|700px]] | ||
| + | |||
| + | == Step 4 of 6: Default Sample Annotations == | ||
| + | |||
| + | [[File:4.png|700px]] | ||
| + | |||
| + | * Please do NOT capture any patient identifying information with the annotation fields (e.g. Name, SS#, etc…) | ||
| + | * Select an ''Annotation Field'' from the pull-down menu. | ||
| + | * Click ''Add'' and it will appear below. | ||
| + | * You may enter default values for these fields, but they can be changed during the order entry process. | ||
| + | * Annotation fields can also be removed from the Study by clicking ''remove''. | ||
| + | * Click ''Next Step (Default Billing Information)''. | ||
| + | |||
| + | |||
| + | == Step 5 of 6: Default Billing Information == | ||
| + | |||
| + | [[File:5.png|700px]] | ||
| + | |||
| + | * If you have an invoice set-up, just enter the ''PO number'' and ''Allocation''. | ||
| + | * Enter your six-digit Grant number(s) as a ''PeopleSoft'' Number. | ||
| + | * Enter your ''PO Number(s)''. | ||
| + | * Enter the ''Allocation'' percentage in each row until they total 100%. | ||
| + | * Click ''Next Step (Review and Create Study)''. | ||
| + | |||
| + | == Step 6 of 6: Review and Create Study == | ||
| + | |||
| + | [[File:6.png|700px]] | ||
| + | |||
| + | * Confirm that all of the information is correct and click ''Create Study''. | ||
| + | |||
| + | [[File:7.png|700px]] | ||
| + | |||
| + | * Enter your password for GIGPAD into the Password box. | ||
| + | * Click Continue. | ||
| + | |||
| + | Study will get created. | ||
Latest revision as of 19:27, 27 September 2016
Contents
Step 1 of 6: Setup
To create a study, access the GIGPAD application and click on New Study that is under the Studies tab.
- Select the Facility and choose Biosample Services
- Click Next Step
When the page prompts you to the next step, continue with the following steps:
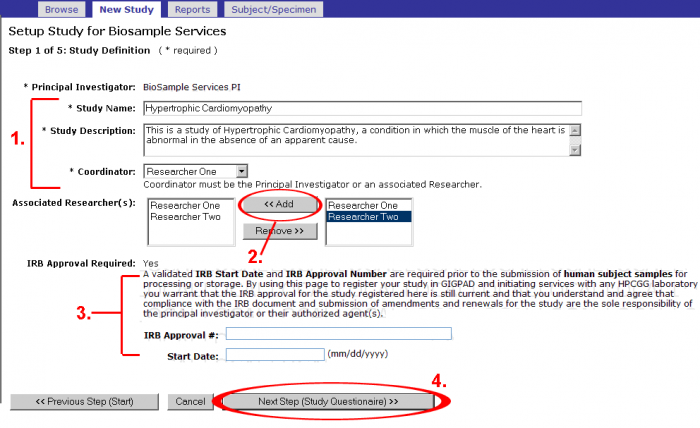
Step 2 of 6: Study Definition
- Enter the Study Name, Study Description, and select the Coordinator
- Select any Associated Researcher(s) and add to this study
- Fill in the IRB Approval # and Start Date
- Click Next Step(Study Questionaire)
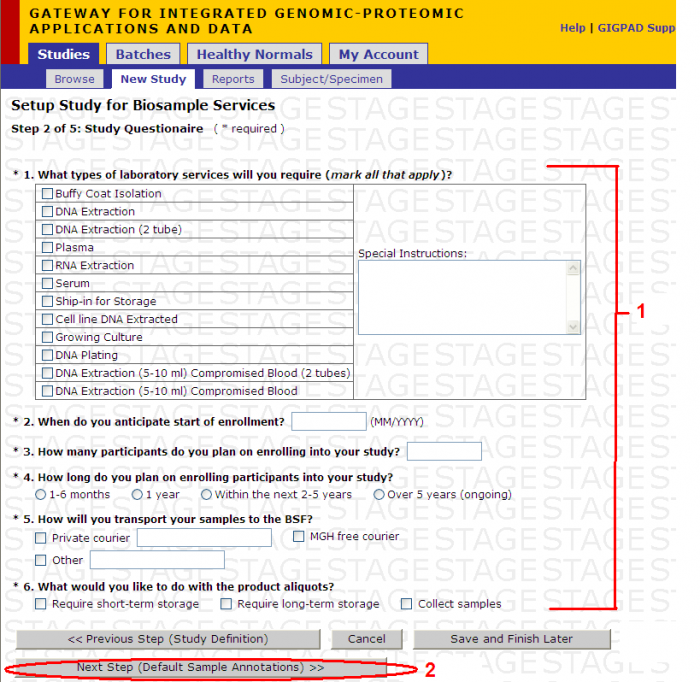
Step 3 of 6 Study Questionnaire
This is the Study Questionaire page, fill in all of the required information. Click Next Step(Default Sample Annotations).
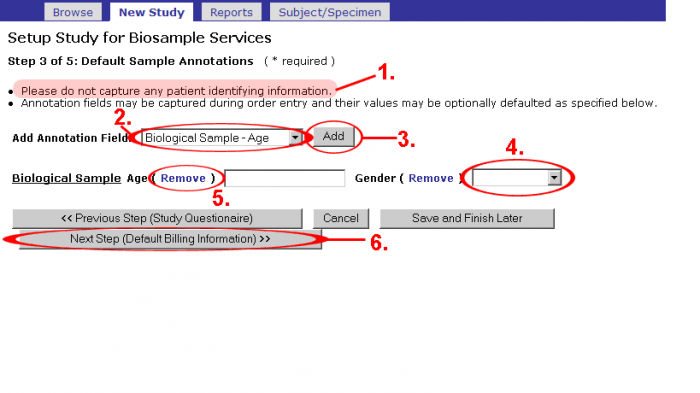
Step 4 of 6: Default Sample Annotations
- Please do NOT capture any patient identifying information with the annotation fields (e.g. Name, SS#, etc…)
- Select an Annotation Field from the pull-down menu.
- Click Add and it will appear below.
- You may enter default values for these fields, but they can be changed during the order entry process.
- Annotation fields can also be removed from the Study by clicking remove.
- Click Next Step (Default Billing Information).
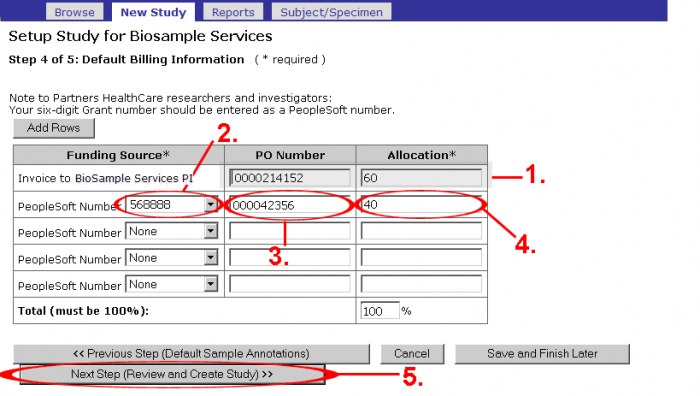
Step 5 of 6: Default Billing Information
- If you have an invoice set-up, just enter the PO number and Allocation.
- Enter your six-digit Grant number(s) as a PeopleSoft Number.
- Enter your PO Number(s).
- Enter the Allocation percentage in each row until they total 100%.
- Click Next Step (Review and Create Study).
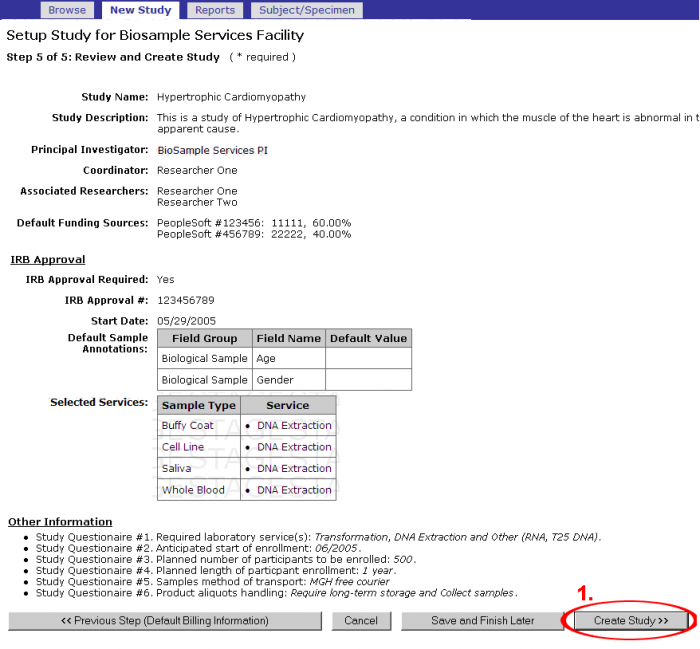
Step 6 of 6: Review and Create Study
- Confirm that all of the information is correct and click Create Study.
- Enter your password for GIGPAD into the Password box.
- Click Continue.
Study will get created.

