Difference between revisions of "Genotyping Order Entry Help"
(→Upload SNP File) |
(→Step 1 of 5: Batch Definition) |
||
| (26 intermediate revisions by 3 users not shown) | |||
| Line 1: | Line 1: | ||
| − | == | + | == Start a New Batch == |
| − | [[File:geno_order_1.png]] | + | |
| + | [[File:geno_order_1.png|700px]] | ||
| + | |||
'*Note: Genotyping Orders can be created only if study exists''' | '*Note: Genotyping Orders can be created only if study exists''' | ||
| Line 7: | Line 9: | ||
* Click ''New Order'' underneath the ''Actions'' column for the appropriate Study | * Click ''New Order'' underneath the ''Actions'' column for the appropriate Study | ||
| + | == Order Services - Order Type == | ||
| − | + | [[File:geno_order_2.png|700px]] | |
| − | |||
| − | [[File:geno_order_2.png]] | ||
# Select the ''Order Type'' to be placed with the help of the radio buttons for the various platforms. | # Select the ''Order Type'' to be placed with the help of the radio buttons for the various platforms. | ||
| − | |||
# Click on ''Next Step'' | # Click on ''Next Step'' | ||
| − | + | == Step 1 of 5: Batch Definition == | |
| − | |||
| − | |||
| − | == | ||
| − | |||
| − | |||
| − | |||
| − | |||
| − | |||
| − | |||
| − | |||
| − | |||
| − | |||
| − | |||
| − | |||
| − | |||
| − | |||
| − | |||
| − | |||
| − | |||
| − | |||
| − | |||
| − | |||
| − | |||
| − | |||
| − | |||
| − | |||
| − | |||
| − | |||
| − | |||
| − | |||
| − | |||
| − | |||
| − | |||
| − | |||
| − | |||
| − | |||
| − | |||
| − | |||
| − | |||
| − | |||
| − | + | [[File:geno_order_6.png|700px]] | |
| − | |||
| − | [[File:geno_order_6.png]] | ||
# Select ''Primary Contact'' from the drop down menu | # Select ''Primary Contact'' from the drop down menu | ||
| − | |||
# Select ''Sample Type'' from the drop down menu | # Select ''Sample Type'' from the drop down menu | ||
| − | |||
# For a small number of samples, you can skip to Step 6 (Click on ''Next (Sample Description)'') if you would like to manually enter your samples. | # For a small number of samples, you can skip to Step 6 (Click on ''Next (Sample Description)'') if you would like to manually enter your samples. | ||
| − | |||
# Select Download Template... to download the Excel file that contains the template that needs to be filled out in order to upload your Sample Input File. See the next page for details on filling out this form. | # Select Download Template... to download the Excel file that contains the template that needs to be filled out in order to upload your Sample Input File. See the next page for details on filling out this form. | ||
| − | |||
# Once the form in completed, select ''Upload...'' to upload the form. See the Upload File page below for more details on the Upload screen. | # Once the form in completed, select ''Upload...'' to upload the form. See the Upload File page below for more details on the Upload screen. | ||
| + | # After the form has been uploaded, click on ''Next Step (Sample Description)'' | ||
| − | + | === Sample Input File Template === | |
| − | + | [[File:geno_order_7.png|700px]] | |
| − | |||
| − | # ''Sample Identifier'' - Sample identifier should only contain numbers, letters, dashes | + | Do not delete the top 2 lines from the Excel file, they are important for sample upload. |
| − | + | # ''Sample Identifier'' - Sample identifier should only contain numbers, letters, dashes and underscores, and should be no longer than 20 characters | |
# ''Tube/Plate Label'' - Should be the same for all samples being submitted on the same plate. | # ''Tube/Plate Label'' - Should be the same for all samples being submitted on the same plate. | ||
| − | |||
Please use more complex names than “Plate1”, for example “Initials_Plate#_date”, (eg “AB_Plate1_042910”) , as we receive do receive many “Plate1”s | Please use more complex names than “Plate1”, for example “Initials_Plate#_date”, (eg “AB_Plate1_042910”) , as we receive do receive many “Plate1”s | ||
| − | |||
If samples are in tubes, each tube label must be unique. Note, for Sequonom orders, the samples must be submitted on plates. | If samples are in tubes, each tube label must be unique. Note, for Sequonom orders, the samples must be submitted on plates. | ||
| − | |||
# ''Well'' – The column is required if you are submitting a plate. | # ''Well'' – The column is required if you are submitting a plate. | ||
| − | |||
# ''Amp method'' - If you are submitting genomic DNA then write "none" into this field, if you are submitting WGA DNA then please provide the method of WGA. | # ''Amp method'' - If you are submitting genomic DNA then write "none" into this field, if you are submitting WGA DNA then please provide the method of WGA. | ||
| − | |||
# ''Quantitation'' - e.g. OD, nanodrop, picogreen, gel estimation | # ''Quantitation'' - e.g. OD, nanodrop, picogreen, gel estimation | ||
| − | |||
# ''Pre-amp Qty (ng)'' - If you are submitting genomic DNA then enter “0" in this field. If you are submitting WGA DNA then please enter the quantity of DNA used in the WGA reaction. | # ''Pre-amp Qty (ng)'' - If you are submitting genomic DNA then enter “0" in this field. If you are submitting WGA DNA then please enter the quantity of DNA used in the WGA reaction. | ||
| − | |||
# If you have duplicate Sample Identifiers on a Plate, then the Sample count and Well count will be different. For example, if you enter NTP as a Sample Identifier for 3 different Wells on Plate1 and Plate1 is a 96 Well Plate, then you will have a Sample Count of 94 and a Well Count of 96. | # If you have duplicate Sample Identifiers on a Plate, then the Sample count and Well count will be different. For example, if you enter NTP as a Sample Identifier for 3 different Wells on Plate1 and Plate1 is a 96 Well Plate, then you will have a Sample Count of 94 and a Well Count of 96. | ||
| − | |||
# If you wish to add annotation fields, add each annotation field as its own column, starting after the ''Pre-amp Qty (ng)'' column. Adding these into the excel file will speed up the Order Entry process, as these will be auto-filled during Step 4. | # If you wish to add annotation fields, add each annotation field as its own column, starting after the ''Pre-amp Qty (ng)'' column. Adding these into the excel file will speed up the Order Entry process, as these will be auto-filled during Step 4. | ||
| − | |||
# All Other fields are optional but it is recommended that you take the time to fill out these fields now so that they are pre-filled during the following steps. | # All Other fields are optional but it is recommended that you take the time to fill out these fields now so that they are pre-filled during the following steps. | ||
| − | === | + | === Upload File === |
| − | [[File:geno_order_8.png]] | + | [[File:geno_order_8.png|700px]] |
| − | # Click ''Browse'', a dialog should appear, navigate to the location where the excel sheet you just created is stored. Select the file. | + | # Click ''Browse'', a dialog should appear, navigate to the location where the excel sheet you just created is stored. Select the file. |
| − | |||
# Click ''Upload Files'' | # Click ''Upload Files'' | ||
| − | [[File:geno_order_9.png]] | + | [[File:geno_order_9.png|700px]] |
# Once the upload is complete, the number of samples should appear in the ''Number of Samples'' text box and the file name should be in the ''Sample Input Files'' box | # Once the upload is complete, the number of samples should appear in the ''Number of Samples'' text box and the file name should be in the ''Sample Input Files'' box | ||
| − | |||
# Click on ''Next Step (Sample Description)'' | # Click on ''Next Step (Sample Description)'' | ||
| − | == | + | == Step 2 of 5: Select Services == |
| − | |||
| − | |||
| − | + | [[File:geno_order_13.png|700px]] | |
| − | |||
| − | |||
| − | |||
| − | |||
| − | |||
| − | |||
| − | |||
| − | |||
| − | |||
| − | |||
| − | |||
| − | |||
| − | |||
| − | |||
| − | |||
| − | |||
| − | |||
| − | |||
| − | |||
| − | |||
| − | |||
| − | |||
| − | |||
| − | |||
| − | |||
| − | |||
| − | |||
| − | |||
| − | |||
| − | |||
| − | |||
| − | |||
| − | |||
| − | |||
| − | [[File:geno_order_13.png]] | ||
| − | |||
| − | |||
| − | |||
| − | |||
# Fill in the ''Special Instructions'' field if needed (up to 1000 characters) | # Fill in the ''Special Instructions'' field if needed (up to 1000 characters) | ||
| − | |||
# Click on ''Next Step (Billing Information)'' | # Click on ''Next Step (Billing Information)'' | ||
| + | == Step 3 of 5: Billing Information == | ||
| − | + | [[File:geno_order_14.png|700px]] | |
| − | |||
| − | [[File:geno_order_14.png]] | ||
'' Note:'' | '' Note:'' | ||
| Line 172: | Line 72: | ||
* The Invoices are set up under the account of the PI associated with the Study as the PI’s Invoice Address. Please see the next page for details on how to set up an Invoice. | * The Invoices are set up under the account of the PI associated with the Study as the PI’s Invoice Address. Please see the next page for details on how to set up an Invoice. | ||
* You may enter as many Funding Sources as needed in any combination of PeopleSoft numbers or Invoices, as long as the Allocation equals 100% | * You may enter as many Funding Sources as needed in any combination of PeopleSoft numbers or Invoices, as long as the Allocation equals 100% | ||
| − | |||
# If you have an invoice set-up, enter the ''PO number'' and ''Allocation'' for that Invoice. | # If you have an invoice set-up, enter the ''PO number'' and ''Allocation'' for that Invoice. | ||
| Line 180: | Line 79: | ||
# After all Funding Sources have been entered, the ''Allocation'' percentage in each row must total 100%. | # After all Funding Sources have been entered, the ''Allocation'' percentage in each row must total 100%. | ||
# Click ''Next Step (SNP Selection)'' | # Click ''Next Step (SNP Selection)'' | ||
| − | |||
| − | |||
''' Setting Up an Invoice Funding Source ''' | ''' Setting Up an Invoice Funding Source ''' | ||
| Line 203: | Line 100: | ||
* Email Address | * Email Address | ||
| + | == Step 4 of 5: Review Order == | ||
| − | + | [[File:geno_order_16.png|700px]] | |
| − | |||
| − | |||
| − | |||
| − | |||
| − | |||
| − | |||
| − | |||
| − | |||
| − | |||
| − | |||
| − | |||
| − | |||
| − | [[File:geno_order_16.png]] | ||
| − | |||
Review your order: | Review your order: | ||
| − | |||
| − | |||
# If you are satisfied with your order click ''Submit Order'' | # If you are satisfied with your order click ''Submit Order'' | ||
| − | |||
# If you need to edit your information click on ''Previous Step (Billing Information)'' to go to the previous step. Continue clicking on ''Previous Step'' until you reach the step you need to edit | # If you need to edit your information click on ''Previous Step (Billing Information)'' to go to the previous step. Continue clicking on ''Previous Step'' until you reach the step you need to edit | ||
| − | |||
# If you would like to finish the study later, click on ''Save and Finish Later'' to return to your order at a later time (Your order will be saved on the Batches->New Batch page) | # If you would like to finish the study later, click on ''Save and Finish Later'' to return to your order at a later time (Your order will be saved on the Batches->New Batch page) | ||
| + | == Step 5 of 5: Order Confirmation == | ||
| − | + | [[File:geno_order_17.png|700px]] | |
| − | |||
| − | [[File:geno_order_17.png]] | ||
| − | |||
| − | |||
| − | |||
# Click on the ''here'' link to generate a printer-friendly PDF version of the order confirmation. Include this document with the samples that you send | # Click on the ''here'' link to generate a printer-friendly PDF version of the order confirmation. Include this document with the samples that you send | ||
| Line 244: | Line 120: | ||
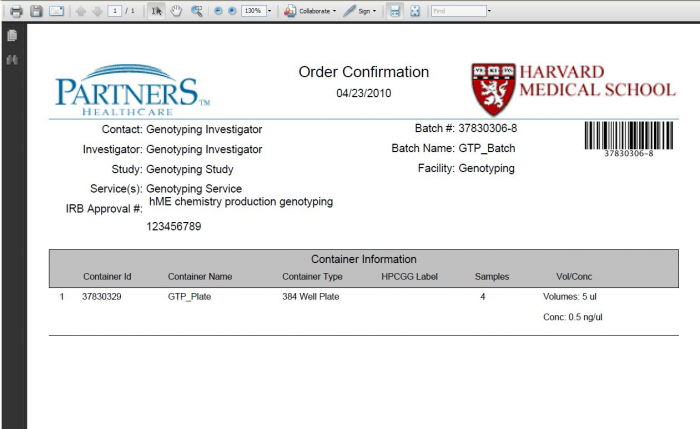
''*Note: Please include this Order Confirmation page with the samples that are sent.'' | ''*Note: Please include this Order Confirmation page with the samples that are sent.'' | ||
| − | [[File:geno_order_18.png]] | + | [[File:geno_order_18.png|700px]] |
Latest revision as of 10:57, 17 October 2016
Contents
Start a New Batch
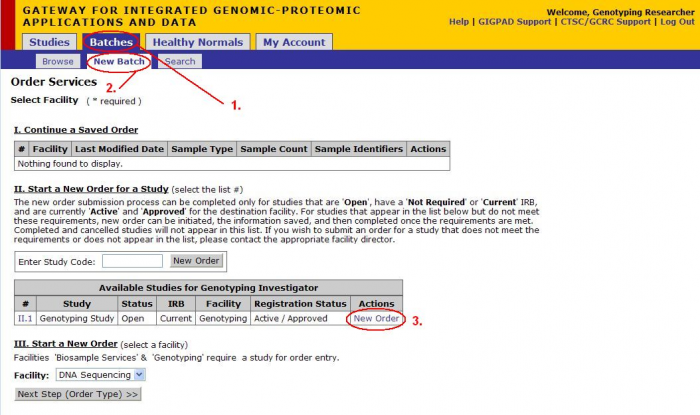
'*Note: Genotyping Orders can be created only if study exists
- Click on Batches
- Click on New Batch
- Click New Order underneath the Actions column for the appropriate Study
Order Services - Order Type
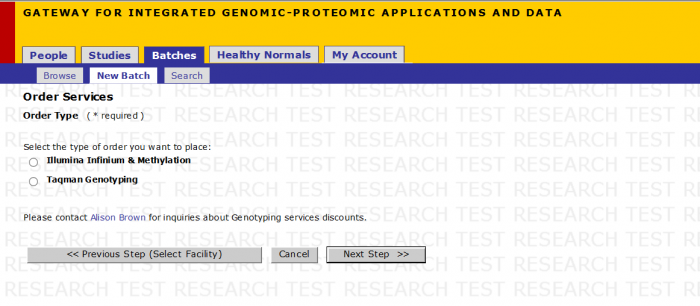
- Select the Order Type to be placed with the help of the radio buttons for the various platforms.
- Click on Next Step
Step 1 of 5: Batch Definition
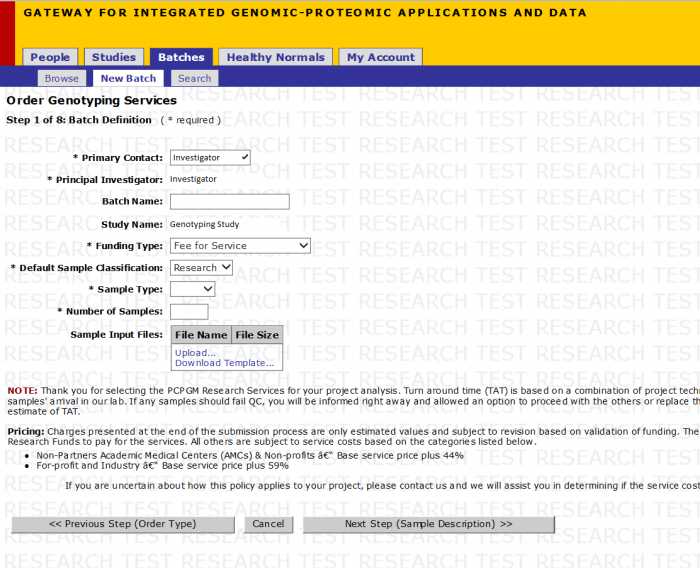
- Select Primary Contact from the drop down menu
- Select Sample Type from the drop down menu
- For a small number of samples, you can skip to Step 6 (Click on Next (Sample Description)) if you would like to manually enter your samples.
- Select Download Template... to download the Excel file that contains the template that needs to be filled out in order to upload your Sample Input File. See the next page for details on filling out this form.
- Once the form in completed, select Upload... to upload the form. See the Upload File page below for more details on the Upload screen.
- After the form has been uploaded, click on Next Step (Sample Description)
Sample Input File Template
Do not delete the top 2 lines from the Excel file, they are important for sample upload.
- Sample Identifier - Sample identifier should only contain numbers, letters, dashes and underscores, and should be no longer than 20 characters
- Tube/Plate Label - Should be the same for all samples being submitted on the same plate.
Please use more complex names than “Plate1”, for example “Initials_Plate#_date”, (eg “AB_Plate1_042910”) , as we receive do receive many “Plate1”s If samples are in tubes, each tube label must be unique. Note, for Sequonom orders, the samples must be submitted on plates.
- Well – The column is required if you are submitting a plate.
- Amp method - If you are submitting genomic DNA then write "none" into this field, if you are submitting WGA DNA then please provide the method of WGA.
- Quantitation - e.g. OD, nanodrop, picogreen, gel estimation
- Pre-amp Qty (ng) - If you are submitting genomic DNA then enter “0" in this field. If you are submitting WGA DNA then please enter the quantity of DNA used in the WGA reaction.
- If you have duplicate Sample Identifiers on a Plate, then the Sample count and Well count will be different. For example, if you enter NTP as a Sample Identifier for 3 different Wells on Plate1 and Plate1 is a 96 Well Plate, then you will have a Sample Count of 94 and a Well Count of 96.
- If you wish to add annotation fields, add each annotation field as its own column, starting after the Pre-amp Qty (ng) column. Adding these into the excel file will speed up the Order Entry process, as these will be auto-filled during Step 4.
- All Other fields are optional but it is recommended that you take the time to fill out these fields now so that they are pre-filled during the following steps.
Upload File
- Click Browse, a dialog should appear, navigate to the location where the excel sheet you just created is stored. Select the file.
- Click Upload Files
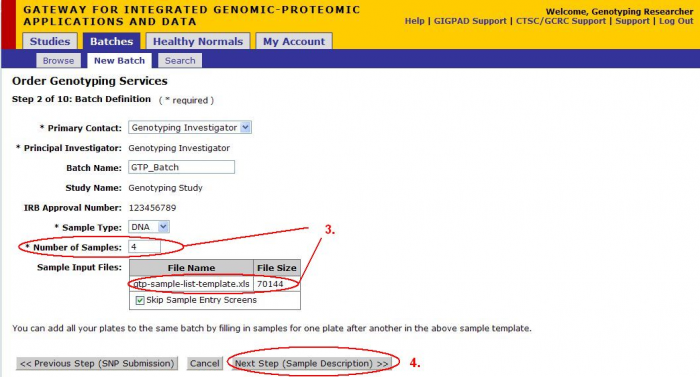
- Once the upload is complete, the number of samples should appear in the Number of Samples text box and the file name should be in the Sample Input Files box
- Click on Next Step (Sample Description)
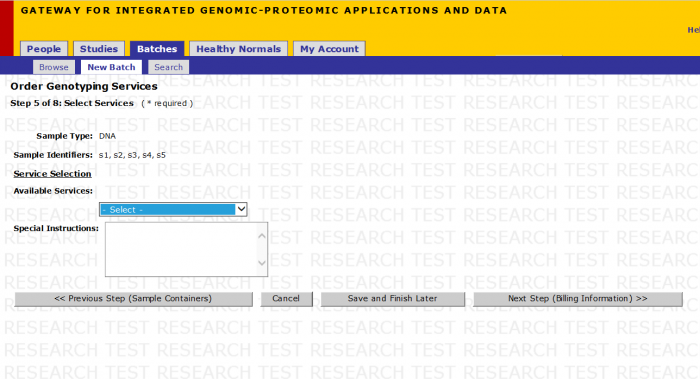
Step 2 of 5: Select Services
- Fill in the Special Instructions field if needed (up to 1000 characters)
- Click on Next Step (Billing Information)
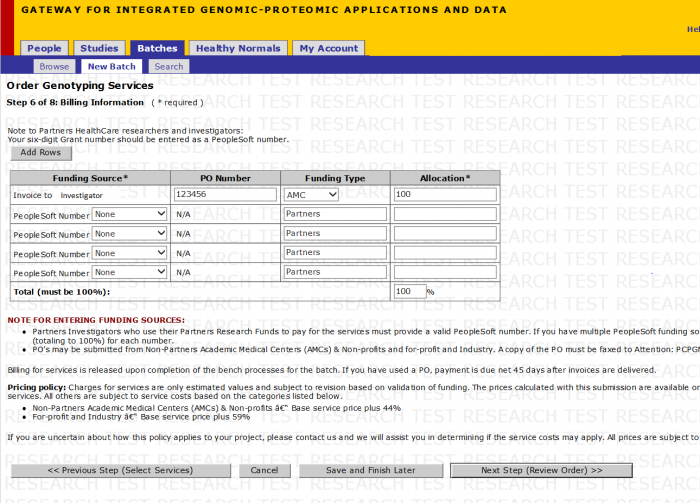
Step 3 of 5: Billing Information
Note:
- PO Number is associated with Invoice Funding Source only (not PeopleSoft)
- The Invoices are set up under the account of the PI associated with the Study as the PI’s Invoice Address. Please see the next page for details on how to set up an Invoice.
- You may enter as many Funding Sources as needed in any combination of PeopleSoft numbers or Invoices, as long as the Allocation equals 100%
- If you have an invoice set-up, enter the PO number and Allocation for that Invoice.
- If you would like to use a PeopleSoft Number(s) (For Partners Researchers Only)
- Select the PeopleSoft number from the drop down menu. If it is not present:
- To enter a new PeopleSoft number, select Add Number... from the drop down menu
- After all Funding Sources have been entered, the Allocation percentage in each row must total 100%.
- Click Next Step (SNP Selection)
Setting Up an Invoice Funding Source
If PO Number allocation exists, please fax copy of your PO document to
Fax: 617-768-8510
Attention: Alison Brown
Orders will not be approved until PO information is received by PCPGM. The PO information must be associated with the PI.
We will need the following information associated with the PO number.
- Physical Invoice Label
- Contact First Name
- Contact Last Name
- Address
- Phone Number
- Fax Number (Optional)
- Email Address
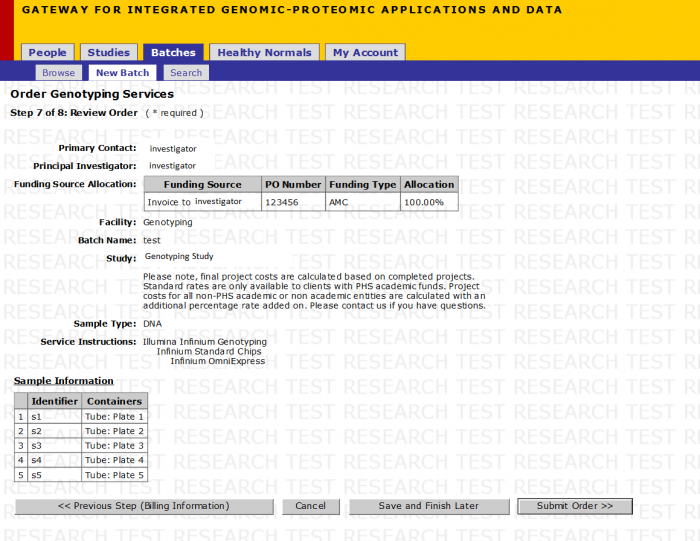
Step 4 of 5: Review Order
Review your order:
- If you are satisfied with your order click Submit Order
- If you need to edit your information click on Previous Step (Billing Information) to go to the previous step. Continue clicking on Previous Step until you reach the step you need to edit
- If you would like to finish the study later, click on Save and Finish Later to return to your order at a later time (Your order will be saved on the Batches->New Batch page)
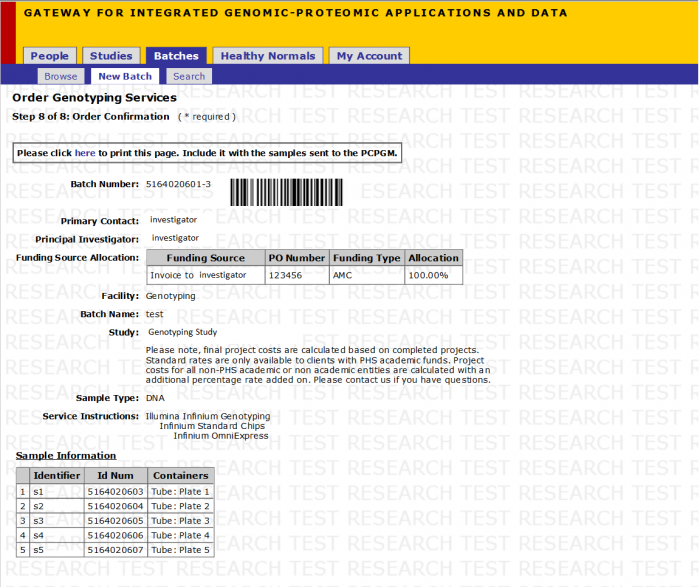
Step 5 of 5: Order Confirmation
- Click on the here link to generate a printer-friendly PDF version of the order confirmation. Include this document with the samples that you send
Print the Order Confirmation Page
*Note: Please include this Order Confirmation page with the samples that are sent.
