Difference between revisions of "NGS Order Entry"
(→For Single Indexing) |
|||
| (9 intermediate revisions by 2 users not shown) | |||
| Line 96: | Line 96: | ||
* Enter values in Sample Details table. | * Enter values in Sample Details table. | ||
** '''Important:''' When entering sample name in the “Labeled As” column only use the following characters: | ** '''Important:''' When entering sample name in the “Labeled As” column only use the following characters: | ||
| − | *** a. alphanumeric characters b. Dash ( - | + | *** a. alphanumeric characters b. Dash ( - ), please remove any spaces in the sample name and ensure the sample names are no more than 20 characters in length. |
* Click "Display Add. Rows button to add more lines in the Sample Details section. The default is 10. To add more than 10, just type in the appropriate number. | * Click "Display Add. Rows button to add more lines in the Sample Details section. The default is 10. To add more than 10, just type in the appropriate number. | ||
* Validation Button - when finished entering values click on the Validate button | * Validation Button - when finished entering values click on the Validate button | ||
| Line 113: | Line 113: | ||
* Select Type of Sample, Type of Library, and Barcode/Index or No Barcode/Index values using the radio buttons. You may select only one value for each category | * Select Type of Sample, Type of Library, and Barcode/Index or No Barcode/Index values using the radio buttons. You may select only one value for each category | ||
* Enter values in Sample Details table. | * Enter values in Sample Details table. | ||
| − | '''Important:''' When entering sample name in the "Labeled As" column only use the following characters: '' | + | '''Important:''' When entering sample name in the "Labeled As" column only use the following characters: ''alphanumeric characters or hyphens (-).'' |
* "Display Addl. Rows" button allows you to add another line in the Sample Details section. | * "Display Addl. Rows" button allows you to add another line in the Sample Details section. | ||
* Continue Button - when finished entering values click on the Continue button. | * Continue Button - when finished entering values click on the Continue button. | ||
| Line 152: | Line 152: | ||
[[File:AddIndexes.png|300px]] | [[File:AddIndexes.png|300px]] | ||
| − | + | * Enter the Custom index name, this index set will be available for use for subsequent batches. | |
| − | + | * Enter the Index priming sequence. If the kit manufacturer does not provide a specific index priming sequence but instead says that it is illumina compatible, then it is very likely that the kit uses the following sequence: | |
| + | GATCGGAAGAGCACACGTCTGAACTCCAGTCAC | ||
| + | * Enter each Index name and then the index sequence as it should be entered into a sample sheet (this is normally designated by the kit manual.) | ||
| + | * Click the Save button. | ||
| + | * Once saved, the list of indexes will appear in the Index Kit box ready for selection | ||
| − | + | ======For Dual Indexing====== | |
| + | Press the “Add custom Index(es)” button | ||
| − | + | *Enter the Custom index name, this index set will be available for use for subsequent batches | |
| − | + | *Enter the Index priming sequence. If the kit manufacturer does not provide a specific index priming sequence but instead says that it is illumina compatible, then it is very likely that the kit uses the following sequence: | |
| − | + | GATCGGAAGAGCACACGTCTGAACTCCAGTCAC | |
| + | *Enter each Index name and then the index sequence as it should be entered into a sample sheet (this is normally designated by the kit manual.) | ||
| + | *Click the Save button. | ||
| + | *Repeat this process to insert the second index sequence, using the “Add 2nd Custom Index(es)” button. | ||
| + | [[File:DualIndex.png| 400px]] | ||
| + | *Once saved, the list of indexes will appear in the Index Kit box ready for selection | ||
| − | + | ===Complete values in Sample Details sections=== | |
| − | + | '''Important:''' When entering sample name in the “Labeled As” column only use the following characters: alphanumeric characters and hyphens (-). | |
| − | '''Important:''' When entering sample name in the “Labeled As” column only use the following characters: | ||
# Select "Validate" Button when complete | # Select "Validate" Button when complete | ||
Latest revision as of 19:45, 27 June 2017
Contents
- 1 Overview
- 2 Batch Creation
- 2.1 Batch Details
- 2.2 Sample Submission Form
- 2.3 Complete values in Sample Details sections
- 2.4 Order DNA Services - Steps 1-6
- 2.5 Service Selection
- 2.6 File Upload During Sample Submission
- 2.7 Billing Information
- 2.8 Order Review and Confirmation
- 3 I placed my batch, now what? Reviewing Batch Status and Retrieving Results
- 4 Appendix
Overview
This document provides the information necessary to access PPM’s GIGPAD to submit and track information for Next Generation Sequencing (NGS) experiments.
- A PI and/or Researcher first need to have an account in GIGPAD.
- Upon account verification, a study should be created in order to request services and submit samples. Studies can be used for different purposes:
- Grouping of samples for processing or analysis associated with a general IRB number with a unifying theme.
- Single PI with several investigators associated with the work. Studies allow setting up the PI/investigator(s) relationships and facilitate managing the data captured under the study. If new investigators join later on they can be added to the study and access the data gathered easily.
- Grouping of control vs. case samples. Investigators can create studies to help them group and organize their samples and data
In the case of NGS studies most likely will be used for a and b.
- Once a study is created a batch is required to submit samples and services associated with these samples
- Once a batch is submitted and the lab receives the samples the experiment starts. Experiments can last days and the researcher can track some of the progress through their batch information in GIGPAD
- Once an experiment is completed and data and results are associated the researcher/PI can download information from the batch through GIGPAD
The following sections describe in detail all the steps required to successfully submit NGS experiments and review/download the results generated.
Batch Creation
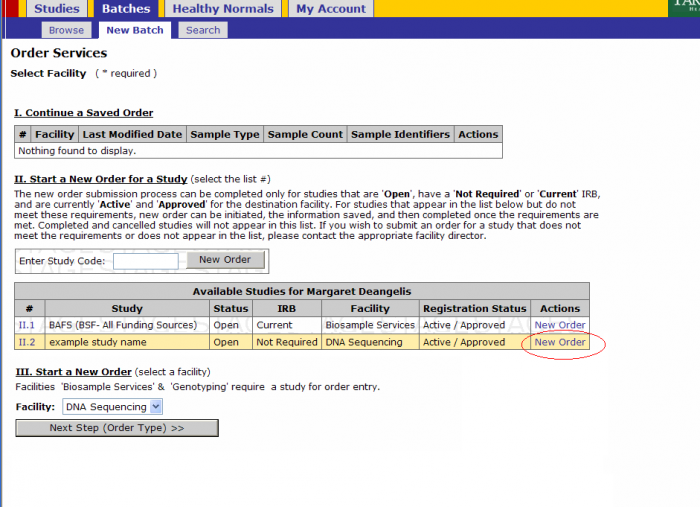
- Click on Batches - New Batch
- You must either select a Study by either
- Selecting New Order under the Actions tab or
- Entering a Study Code in the text box and clicking New Order button
Click on the New Order link on the study for which you’ll submit a batch
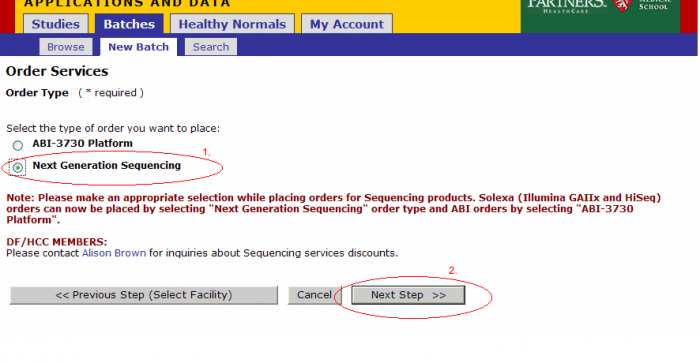
- Select Platform
Batch Details
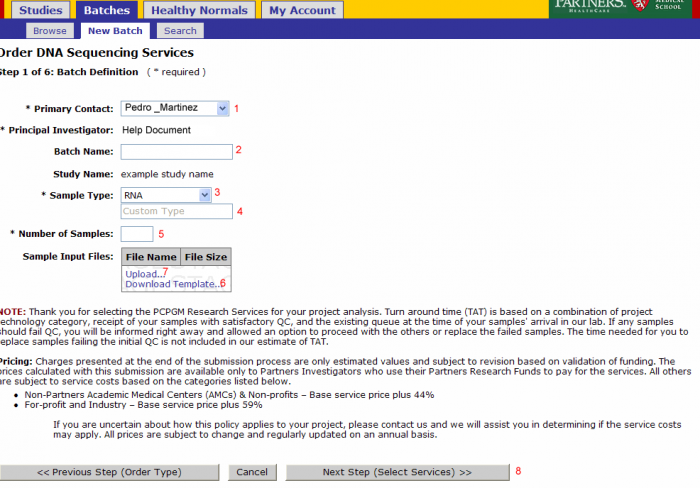
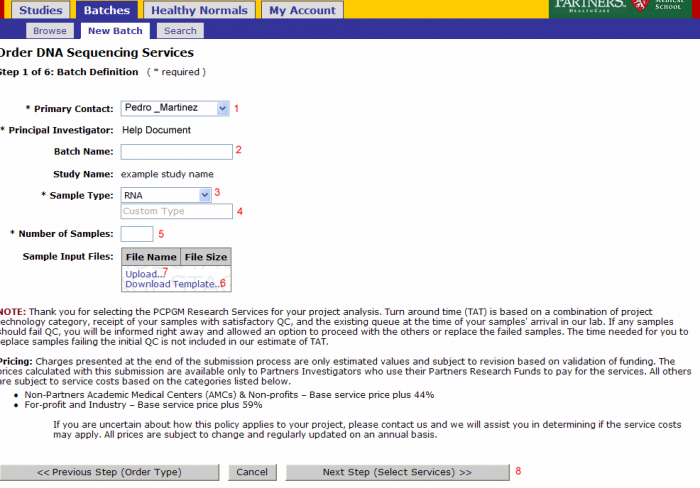
- Primary Contact: Defaults from study and can be changed for the batch
- Batch Name: Optional name to identify your batch
- Sample Type: Select RNA, Genomic DNA, shRNA Genomic, PCR Treatment, Library, or Other
- Note: Do not override Sample Type after Sample Submission File Import.
- If other is selected enter the type in this field
- Number of Samples: Will be pre populated once the sample input file is uploaded
- Note: Do not override Number of Samples after Sample Submission File Import.
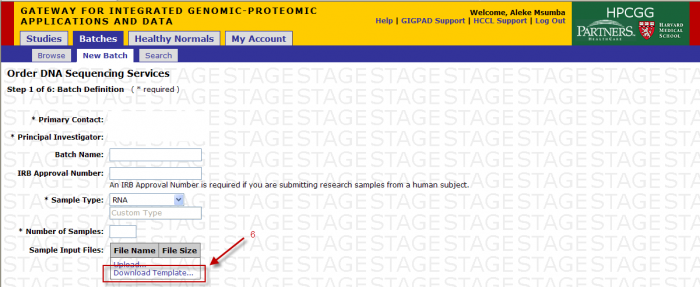
- Download Template: (see Sample Submission Form section)
Sample Submission Form
This section describes the functionality for completing the Sample Submission Sheet for Next Generation Sequencing orders. The following topics will be covered
- Sample Submission Sheet access
- Need Library Construction Only – Form
- Need Library Construction and Sequence Detection - Form
- Need Sequence Detection Only - Form
- Error Messaging
- Saving your form
Access Sample Submission Form
You will access the Sample Submission Form from the Download Template link in Step 1
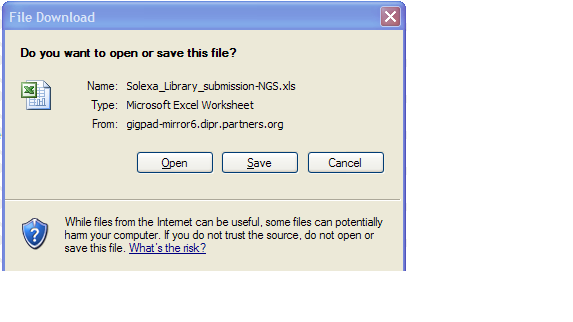
- Clicking on “Download Template” link will present you with the following pop up.
- Click save and select location on your desktop to place the .xls file.
- Please note that MS Excel 2003 must be installed on your system
- If you are using a newer version of MS Excel, please save the Sample Submission File in the .xls format.
Mac and Linus Users
Please contact Sarah Yuhas for assistance in completing and submitting the Sample Submission Forms.
Contact Information Name: Sarah Yuhas Phone: (617) 768-8557 E-mail: PPMCore@PARTNERS.ORG
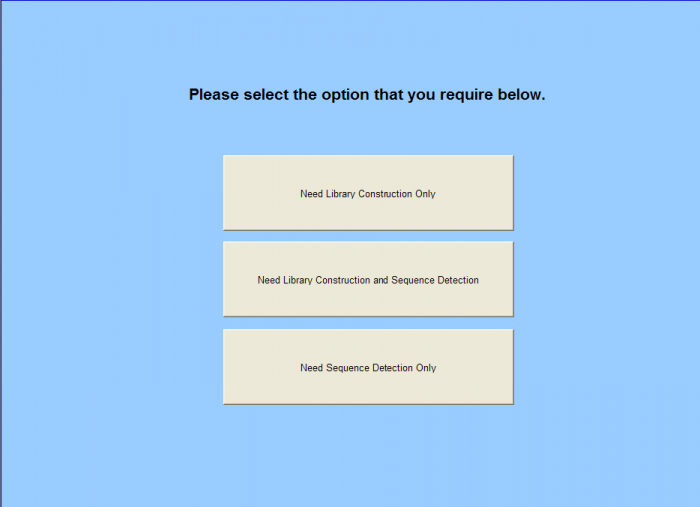
Sample Submission Form - Research Home Page
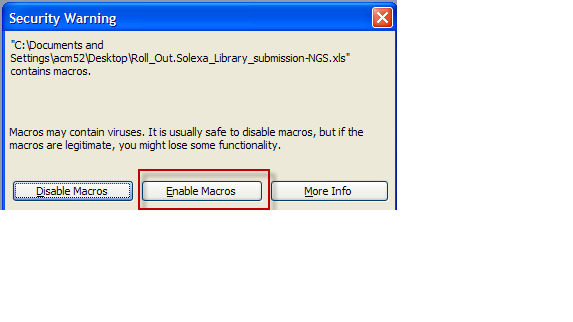
- Open up MS Excel workbook that was saved
- At Security warning choose "Enable Macros" button
- Note: This warning may not appear depending on the computer's secruity settings.
Sample Submission Form - Home Page
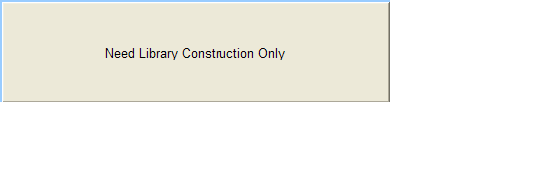
Need Library Construction Only
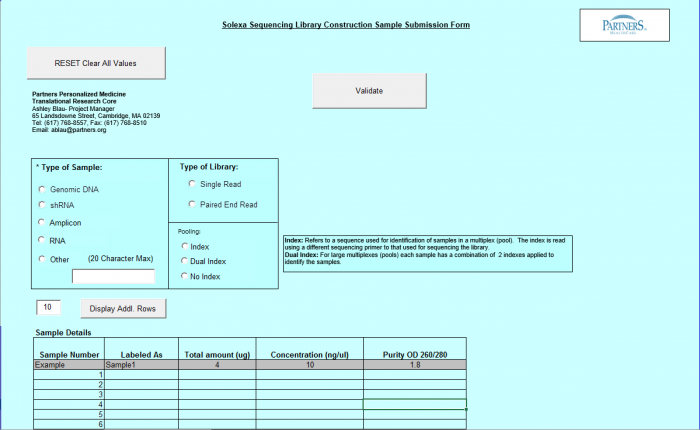
To access Need Library Construction Only form – click on the following button on the Sample Submission Form Home Page
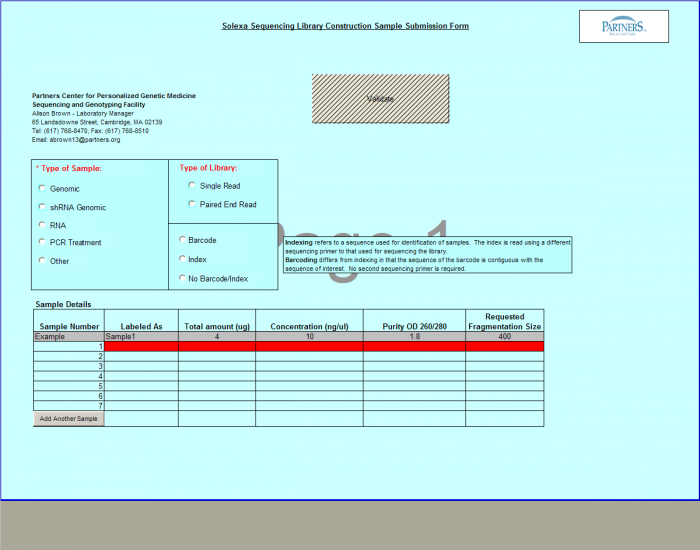
Need Library Construction Only Form
- Select Type of Sample, Type of Library, and Barcode/Index or No Barcode/Index values using the radio buttons. You may select only one value for each category
- Enter values in Sample Details table.
- Important: When entering sample name in the “Labeled As” column only use the following characters:
- a. alphanumeric characters b. Dash ( - ), please remove any spaces in the sample name and ensure the sample names are no more than 20 characters in length.
- Important: When entering sample name in the “Labeled As” column only use the following characters:
- Click "Display Add. Rows button to add more lines in the Sample Details section. The default is 10. To add more than 10, just type in the appropriate number.
- Validation Button - when finished entering values click on the Validate button
- See Error Messaging in section 4.2.6
Need Library Construction and Sequence Detection
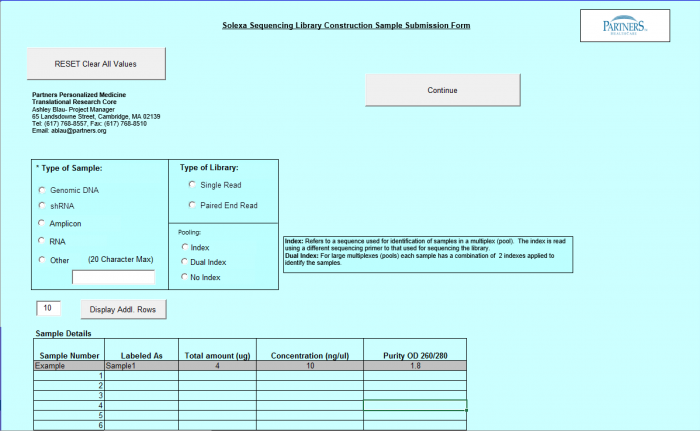
To access Need Library Construction and Sequence Detection form – click on the following button on the Sample Submission Form Home Page
Need Library Construction and Sequence Detection Form
- Select Type of Sample, Type of Library, and Barcode/Index or No Barcode/Index values using the radio buttons. You may select only one value for each category
- Enter values in Sample Details table.
Important: When entering sample name in the "Labeled As" column only use the following characters: alphanumeric characters or hyphens (-).
- "Display Addl. Rows" button allows you to add another line in the Sample Details section.
- Continue Button - when finished entering values click on the Continue button.
- See Error Messaging in section 4.2.6
- Note: This form and functionality is the same as the Library Construction Only form with the exception of the "Continue" Button, which leads to the Sequence Detection form.
Values carried over to Sequence Detection Form
The following values that are entered onto the Library Construction Form will be carried over to the Sequence Detection Form and do not need to be reentered.
- Type of Library
- Type of Library [seen as Read Type in Sequence Detection form]
- Barcode, Index, or No Barcode/Index
- Sample Details
- “Labeled As” value
- Requested Fragmentation Size [becomes Size(bp) in Sequence Detection Form]
Need Sequence Detection Only
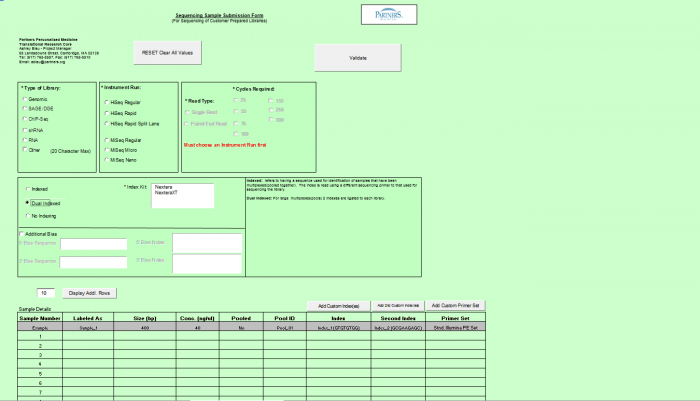
To access Need Sequence Detection Only form – click on the following button on the Sample Submission Form Home Page
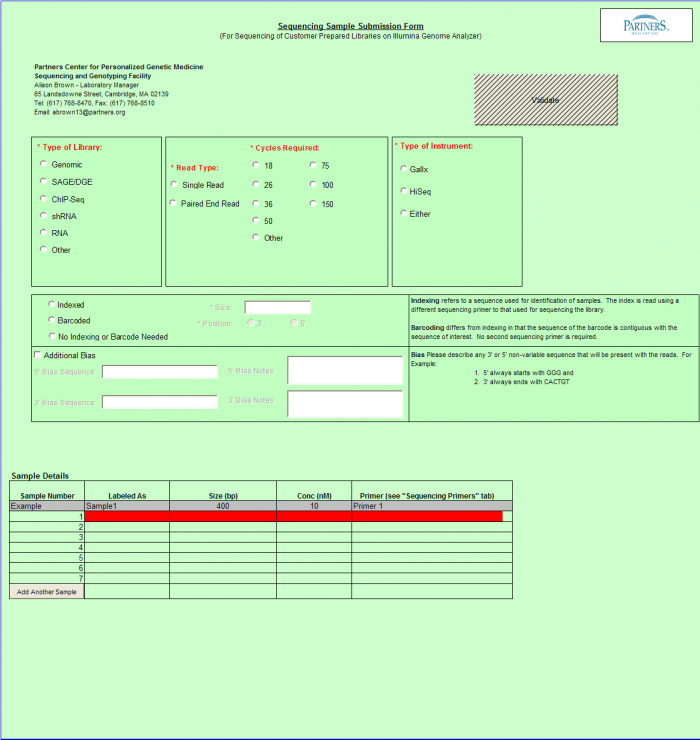
Need Sequence Detection Only
General Use
- Select a single value using the radio buttons for the following categories. If you are requesting more than one run type, please submit a batch per run type.
- Type of Library
- Instrument Run
- Read Type
- Cycles Required
- Indexed, Dual Indexed, or No Indexing or Barcode Needed
If Indexed or Dual Indexed is chosen, please select the kit being used from the right hand side box. If the kit being used is not in the list, it can be added as a custom kit, by using the Add Custom Index(es) button above the samples details table.
For Single Indexing
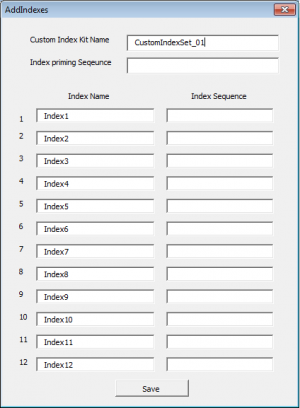
Press the "Add Custom Index(es)" button
- Enter the Custom index name, this index set will be available for use for subsequent batches.
- Enter the Index priming sequence. If the kit manufacturer does not provide a specific index priming sequence but instead says that it is illumina compatible, then it is very likely that the kit uses the following sequence:
GATCGGAAGAGCACACGTCTGAACTCCAGTCAC
- Enter each Index name and then the index sequence as it should be entered into a sample sheet (this is normally designated by the kit manual.)
- Click the Save button.
- Once saved, the list of indexes will appear in the Index Kit box ready for selection
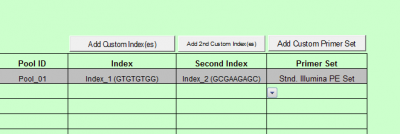
For Dual Indexing
Press the “Add custom Index(es)” button
- Enter the Custom index name, this index set will be available for use for subsequent batches
- Enter the Index priming sequence. If the kit manufacturer does not provide a specific index priming sequence but instead says that it is illumina compatible, then it is very likely that the kit uses the following sequence:
GATCGGAAGAGCACACGTCTGAACTCCAGTCAC
- Enter each Index name and then the index sequence as it should be entered into a sample sheet (this is normally designated by the kit manual.)
- Click the Save button.
- Repeat this process to insert the second index sequence, using the “Add 2nd Custom Index(es)” button.
- Once saved, the list of indexes will appear in the Index Kit box ready for selection
Complete values in Sample Details sections
Important: When entering sample name in the “Labeled As” column only use the following characters: alphanumeric characters and hyphens (-).
- Select "Validate" Button when complete
Other Functions and Feature Exposure
- Additional Bias entries for 5’ Bias Sequence and 5’ Bias Notes/3’ Bias Sequence and 3’ Bias Notes becomes available by clicking the check box next to “Additional Bias”.
Note: You must fill in at least one of the four available text boxes.
Error Messaging - Sample Submission Form
Error messaging for the Library Construction Only form and Sequencing Detection Only form appear in line and in red on the form itself.
An initial Microsoft pop up appears like below
You must clear pop up by Clicking “OK” button and then view fields which are in error.
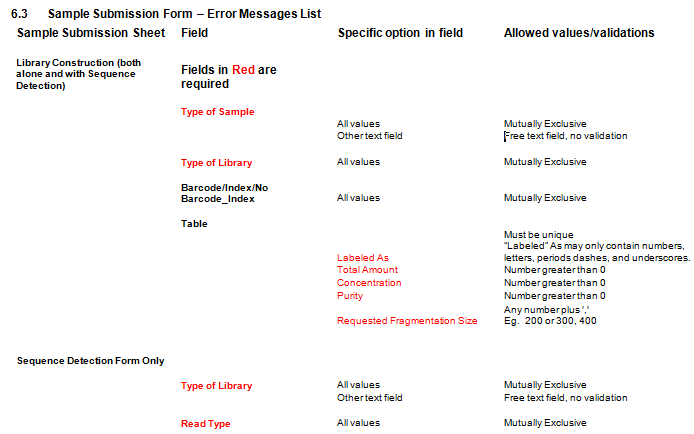
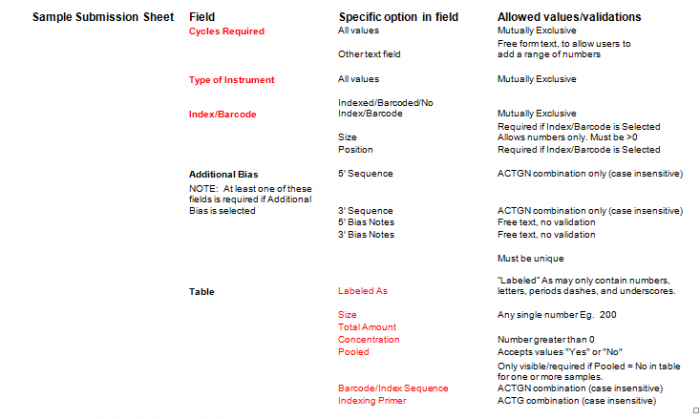
List of Error Messages
Please see full list in Section 6.3 of the Appendix.
Library Construction Only - Error Messaging
Example Screen Shot
Sequence Detection Only - Error Messaging
Example Screen Shot
Validation and Saving Sample Submission File
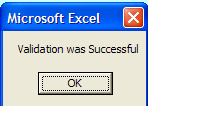
Once the form is validated and there are no errors, you will receive this message:
VERY IMPORTANT
you must then save the file to your local machine using File > Save or Save As function in MS Excel.
Order DNA Services - Steps 1-6
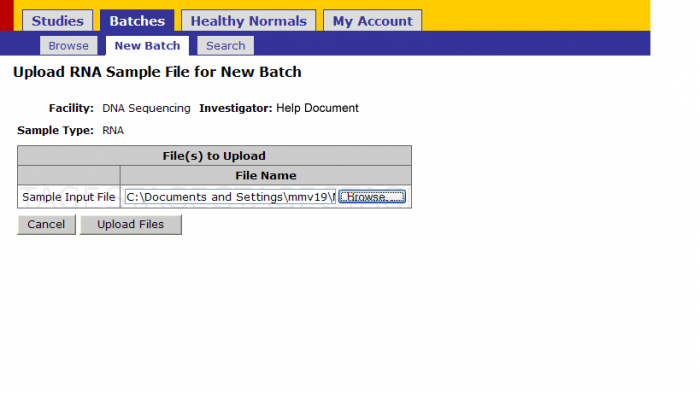
- Upload: Once the sample submission form is created upload it by clicking this link.
Browse for the sample submission form on your computer and click on upload files
Click on Upload Files
Service Selection
Services Selected Sample Submission Form
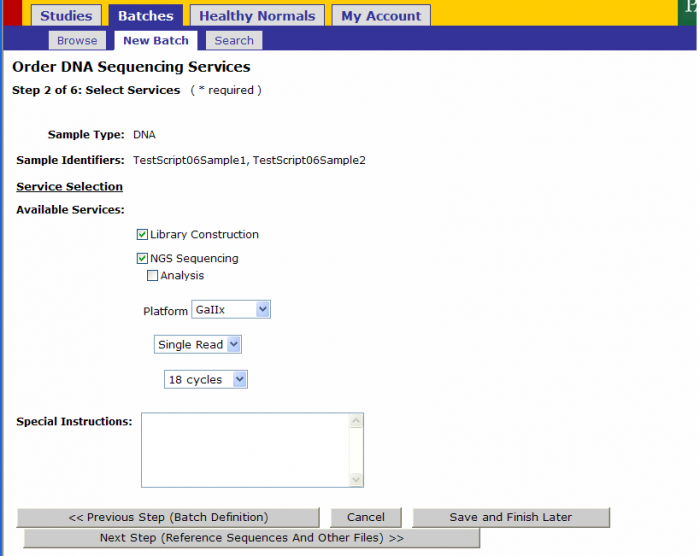
- The following values will be pre-populated in Step 2 from the values on the Sample Submission Form
- Library Construction
- NGS Sequencing
- Platform
- Read Type
- Number of Cycles
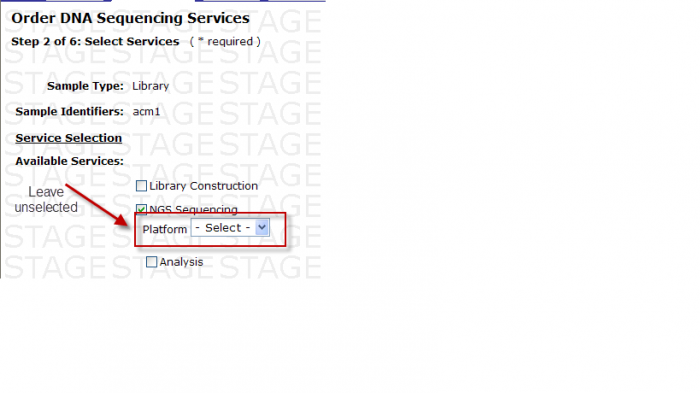
- Exceptions: When Type of Instrument on Sequence Detection Form is “Either”, Platform Option under Available Services is available for your selection. DO NOT select a platform here.
Available Services
You may select the following in Step 2 – Select Services
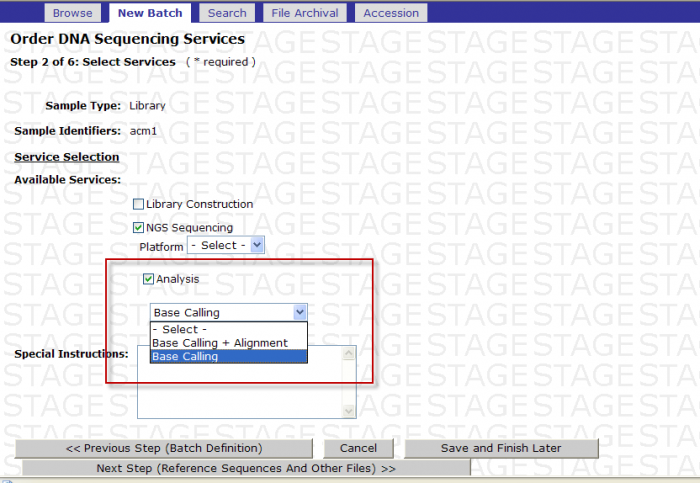
- Check the box next to Analysis
- -Select- box appears
You MUST then select either Base Calling or Base Calling + Alignment
Screen Shot
Base Calling: If you select Base Calling then customer will receive the fastq formatted sequence files. These files are split according to the read number.
Base Calling + Alignment: If you select Base Calling + Alignment, then the customer will receive the fastq formatted sequence files and the Illumina specific export files that has the alignment. These files are split according to the read number.
After making selection click on Next Step.
File Upload During Sample Submission
You Select Base Calling
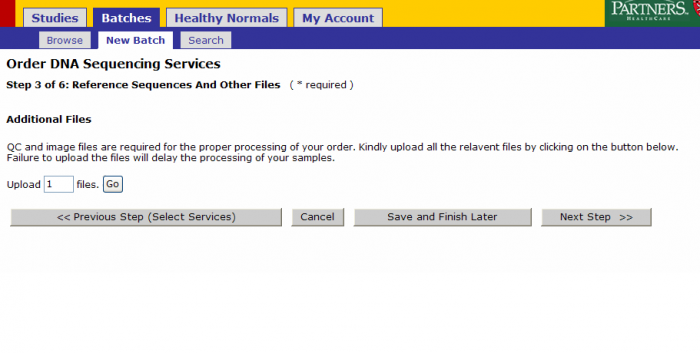
If you select Base Calling then the following screen appears after clicking Next Step from the Step 2 of Select Services
You can upload QC and image files at this step.
You Select Base Calling and Alignment
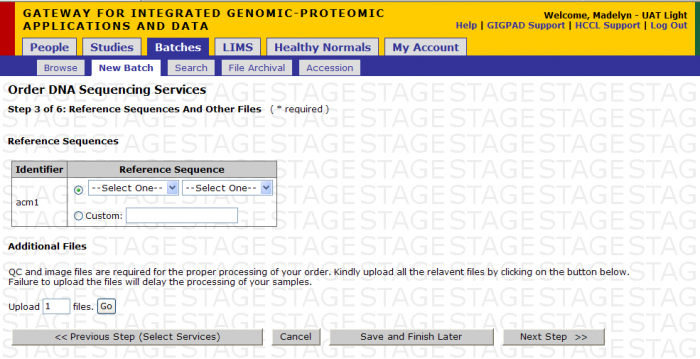
If you select Base Calling + Alignment, then the following screen appears after clicking Next Step from Step 2 of Select Services.
A. You can upload custom reference genome file.
- Name the reference using the free form text box
- Upload the reference file using the Additional Files function
B. You can select reference sequence from pre-defined list Options Include:
- Human hg18 or hg19
- Mouse mm9
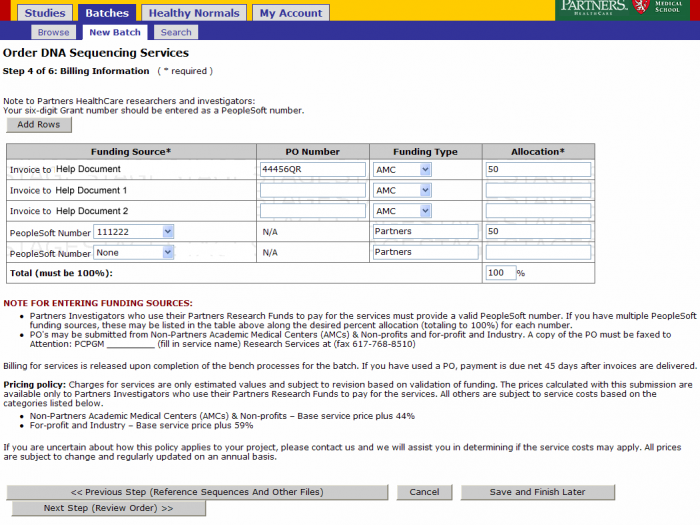
Billing Information
Leave the billing information as defaulted from the study or update as needed. Click on Next Step
Order Review and Confirmation
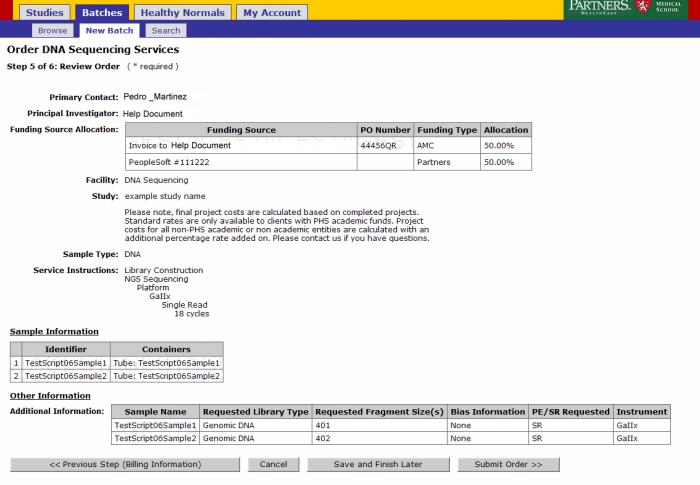
Review your order. At this point you can Save and Finish later or submit your order. Note: See Appendix 6.2 Retrieving Partially Completed Orders
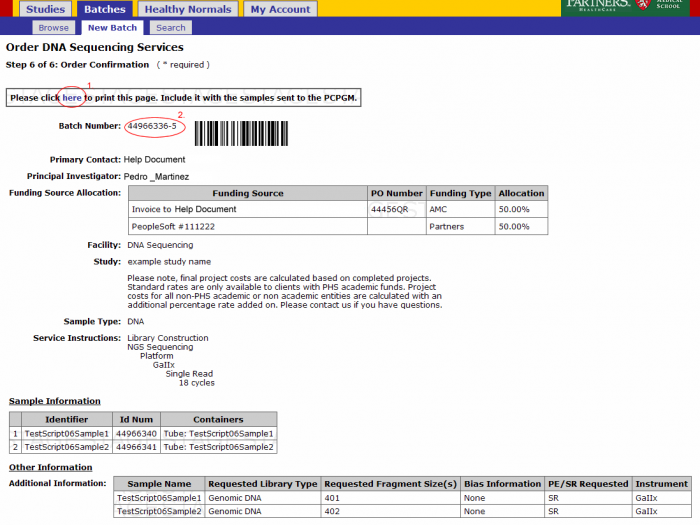
- From the order confirmation screen you can get a confirmation PDF file that can be printed for your records. This file can be sent along with your samples.
- The batch number is the information required to refer to this order in GIGPAD. All results, statuses, etc. will be accessed in GIGPAD by referring to the batch number.
I placed my batch, now what? Reviewing Batch Status and Retrieving Results
After a batch has been placed you can review its status and retrieve results when the batch is completed.
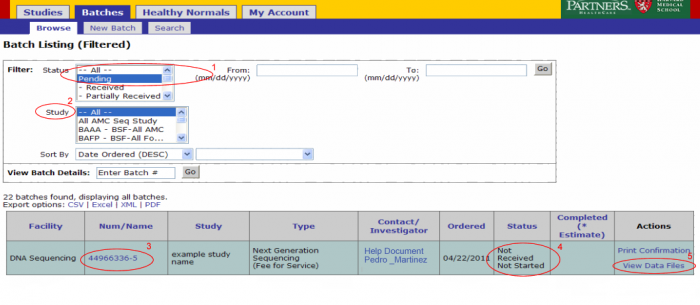
Login to GIGPAD, the screen presented by default is the batch browsing screen.
- The status filter is defaulted to Pending. Only batches that are not yet completed should be listed.
- he study filter is defaulted to All. Narrow your search by selecting a particular study.
Details of a particular batch can be accessed directly by entering the batch number next to View Batch Details and clicking ok.
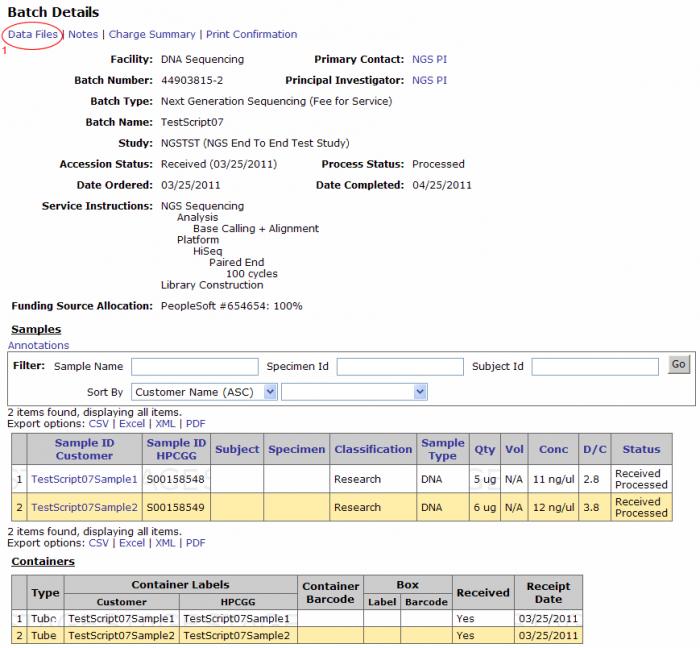
- The batch number link leads to the batch details page. From this page you can view the samples submitted in the batch, access data files, view or add notes, and print confirmation.
- The status indicates where in the lab process the samples in your batch are.
- The View Data Files link should be used to access data such as results uploaded for the batch.
Accessing Batch Results
Most likely results for a batch will be available to download from GIGPAD when a batch has been completed by the lab. i. Select Completed on the Status filter and click go ii. All completed batches will be displayed iii. Click on the batch number link or on the View Data Files link of the batch you want to review.
Note: Alternatively you can search by entering the batch number if you know it.
From the Batch Details page click on the Data Files link on the top left corner. (Clicking on the Data Files link from the batch browsing screen leads to this screen).
Downloading Data Files
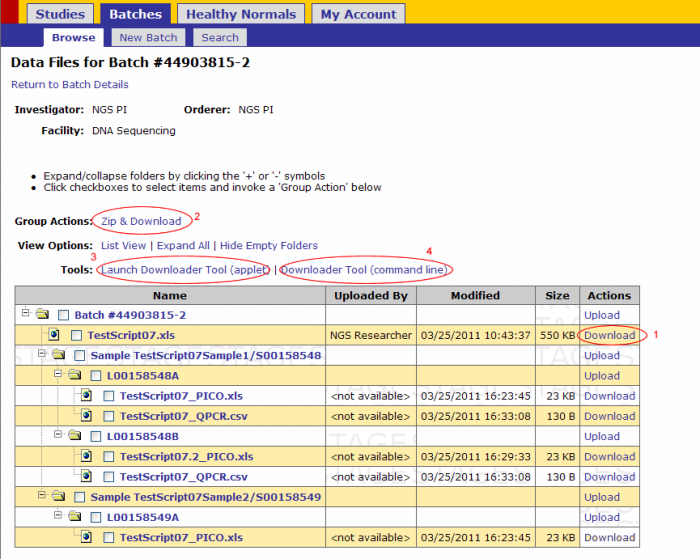
There are 4 ways to download files from GIGPAD
- Click on the Download link next to the file (recommended only for small files downloaded independently)
- Zip and Download action- recommended for small files downloaded as a group
- Download files through the Applet Downloader Tool- Recommended for any file type of any size
- Downloader Tool (command line) – recommended for large files
For NGS data files use methods 3 or 4. Method 4 is explained on this guide.
Downloader Tool(command line)
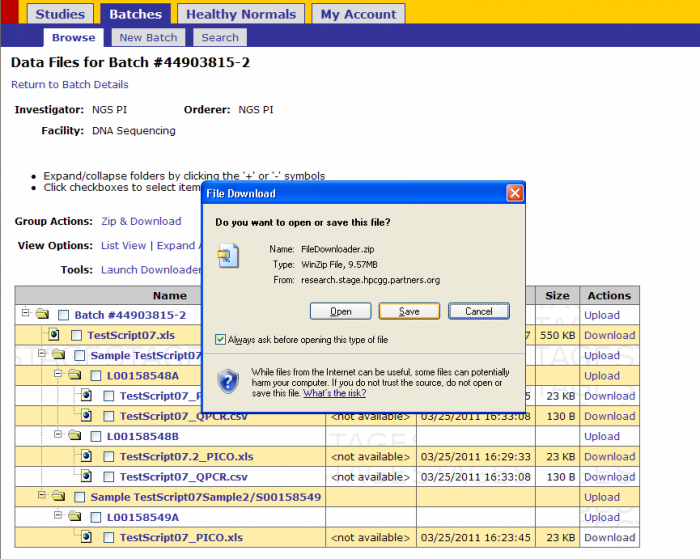
- Click on Downloader Tool(command line)
- Click Save
- Select a location to save the FileDownloader.zip
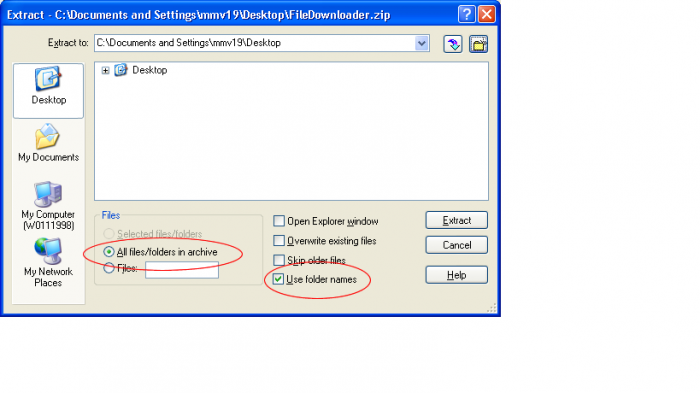
- Open the FiledDownloader.zip file
- Ensure Use Folder Names and All Files/Folders in archive are selected and click Extract
- Open the directory in which the files where extracted. There should be a FileDownloader-ReadMe.txt for more reference
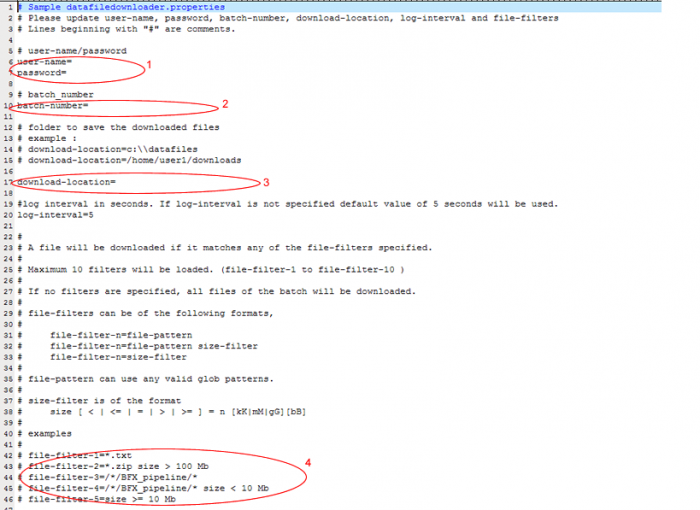
- In a text editor such as WordPad open datafiledownloader-example.properties
i. Enter your GIGPAD username and password. Do not leave any spaces ie. Username=jjp123 ii. Enter the batch number for which you want to download files iii. Enter the location on your computer where you want the files downloaded to be saved iv. If you would like to download all the files available for a batch do not provide a filter. Otherwise, follow the examples to filter by any of these options. Example:
File-filter=size=>10 Mb
v. Save as datafiledownloader.properties in the same directory as the example file.
- Open a command prompt by going to start > run. Enter cmd on the Open: textbox.
- Type CD to the location in which the file downloader was extracted.
- Type FiledownloaderCMDLine.bat
- Files should start to download in the directory provided on the properties file.
NOTE: The filedownloader.zip only needs to be downloaded once. After the initial download you just need to modify the .properties file and enter a new batch number and new filters to download data from other batches.
Appendix
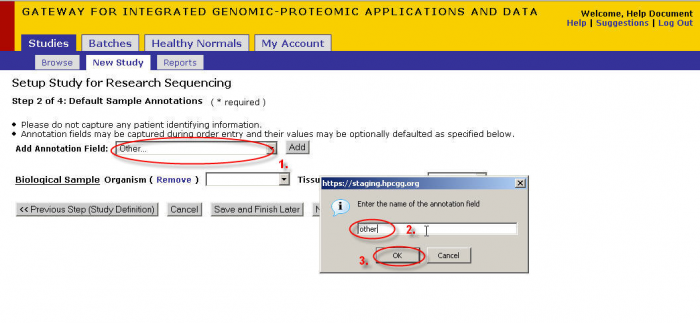
Adding Annotations
- Select an annotation from this drop down or select other then Click ‘Add’.
- If you select ‘other’ then a pop-up will appear. Enter the name you wish to give the annotation.
- Click ‘OK’ when you are satisfied with your annotation name.
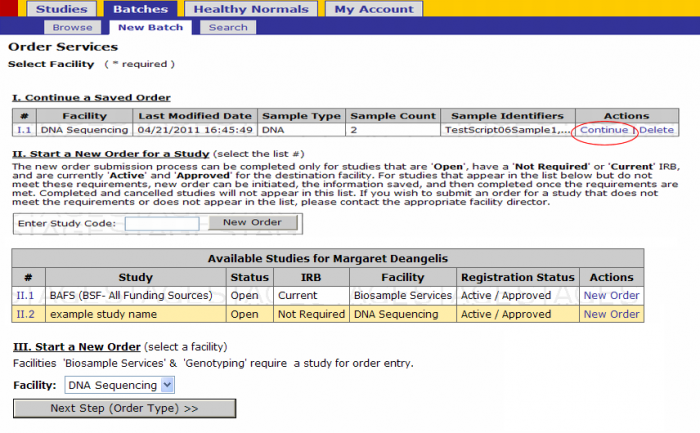
Retrieving Partially Completed Batches(Save and Finish Later)
To retrieve partially completed batches:
- login to GIGPAD
- Click on Batches – New Batch
- Click on the Continue link on the saved batch
