Difference between revisions of "Genotyping Order Entry Help"
Jump to navigation
Jump to search
(step 1) |
|||
| Line 12: | Line 12: | ||
[[File:geno_order_2.png]] | [[File:geno_order_2.png]] | ||
| − | # Select the '' | + | # Select the ''Order Type'' to be placed with the help of the radio buttons for the various platforms. |
# Click on ''Next Step'' | # Click on ''Next Step'' | ||
| Line 20: | Line 20: | ||
=='''Step 1 of 10: SNP Submission'''== | =='''Step 1 of 10: SNP Submission'''== | ||
| + | |||
| + | ==='''Upload SNP File'''=== | ||
| + | |||
| + | [[File:geno_order_3.png]] | ||
| + | |||
| + | # Click on ''Cancel'' button to cancel the current operation at any time and to go back to the previous screen. | ||
| + | |||
| + | # Click on the ''here'' button (see image above) to download the template file (see next page for a more detailed description of this file) | ||
| + | |||
| + | # Once you have filled out the SNPs file, Click Browse, a dialog should appear, navigate to the location where the excel sheet you just created is stored. Select the file. | ||
| + | |||
| + | # Click ''Upload Files'' | ||
| + | |||
| + | |||
| + | ==='''Sample SNPs File Template'''=== | ||
| + | [[File:geno_order_4.png]] | ||
| + | '' | ||
| + | *Note: Validation is also run when the file is uploaded. If the Marker Names or Sequences are incorrect, you will not be able to upload the file. | ||
| + | '' | ||
| + | |||
| + | # Do not change/delete the first 3 rows in this template | ||
| + | # Fill in the Marker Names. The names must be EXACTLY the names of the sequences provided for assay design | ||
| + | #Fill in the Sequences | ||
| + | #Fill out any Hugo Symbols and RS Numbers (Optional) | ||
| + | #When you have finished entering your data, click on the Validate SNP Syntax. This will validate the following: | ||
| + | #*Marker Name must be unique and can contain only letters, numbers, underscores, hyphens and periods with a maximum of 50 characters | ||
| + | #*Sequences must be unique and can have only A, G, T, C and N's and the SNP of interest should be represented as [A/G] or [-/T] or [C/-] or [A/T/C] | ||
| + | #*SNP should be flanked by at least 100 bases on either side (If the flank contains more than 100 bases, it will be trimmed down to 100 bases) | ||
| + | # Once validation is complete, save the template as an Excel (xls) file. | ||
| + | |||
| + | |||
| + | |||
| + | ==='''Confirm SNP File Digestion'''=== | ||
| + | |||
| + | [[File:geno_order_5.png]] | ||
| + | |||
| + | ''*Note: If markers with same name are uploaded, then they would have the name appended with date. (MarkerName_mmddyy). '' | ||
| + | |||
| + | # To upload another SNP file, click ''Upload Again'' | ||
| + | # Once you have finished uploading your files. Click on ''Confirm and Save'' | ||
| + | |||
=='''Step 2 of 10: Batch Definition'''== | =='''Step 2 of 10: Batch Definition'''== | ||
| + | |||
=='''Step 3 of 10: Sample Description'''== | =='''Step 3 of 10: Sample Description'''== | ||
Revision as of 16:28, 27 July 2016
Contents
- 1 Start a New Batch
- 2 Order Services - Order Type
- 3 Step 1 of 10: SNP Submission
- 4 Step 2 of 10: Batch Definition
- 5 Step 3 of 10: Sample Description
- 6 Step 4 of 10: Sample Annotation
- 7 Step 5 of 10: Sample Containers
- 8 Step 6 of 10: Select Services
- 9 Step 7 of 10: Billing Information
- 10 Step 8 of 10: SNP Selection
- 11 Step 9 of 10: Review Order
- 12 Step 10 of 10: Order Confirmation
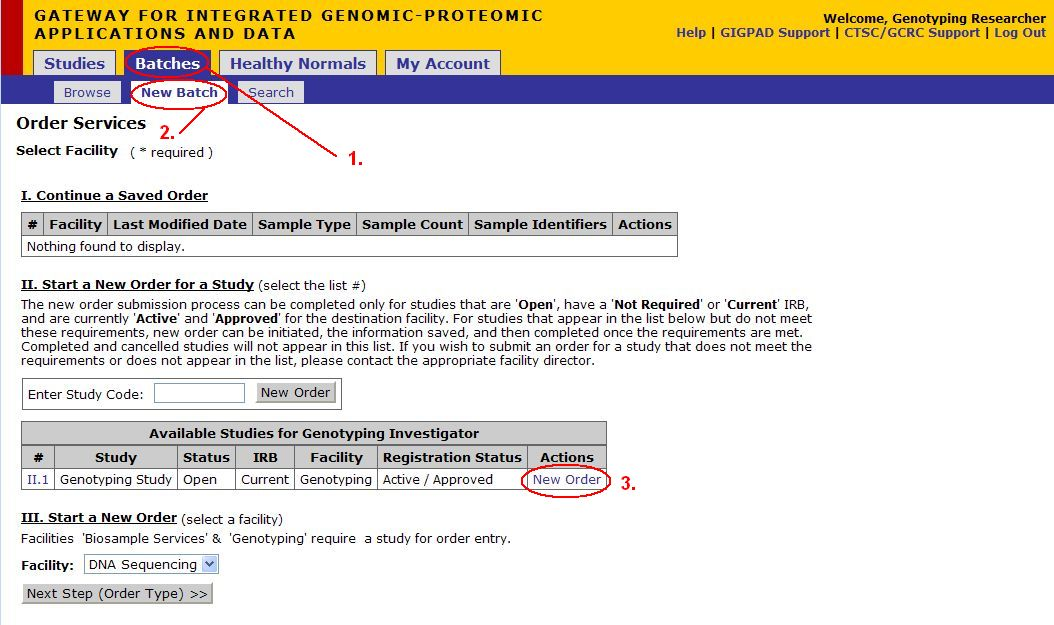
Start a New Batch
 '*Note: Genotyping Orders can be created only if study exists
- Click on Batches
- Click on New Batch
- Click New Order underneath the Actions column for the appropriate Study
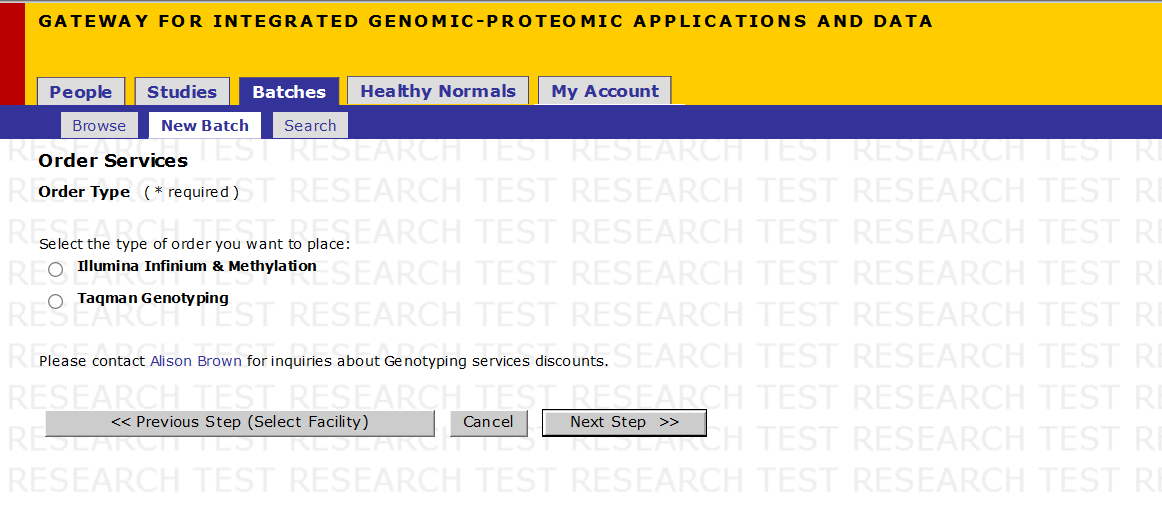
Order Services - Order Type
- Select the Order Type to be placed with the help of the radio buttons for the various platforms.
- Click on Next Step
For Ordering Services on Sequenom Platform, follow the steps below on SNP Submission. For Illumina Platform or Other Services skip to Batch Definition.
Step 1 of 10: SNP Submission
Upload SNP File
- Click on Cancel button to cancel the current operation at any time and to go back to the previous screen.
- Click on the here button (see image above) to download the template file (see next page for a more detailed description of this file)
- Once you have filled out the SNPs file, Click Browse, a dialog should appear, navigate to the location where the excel sheet you just created is stored. Select the file.
- Click Upload Files
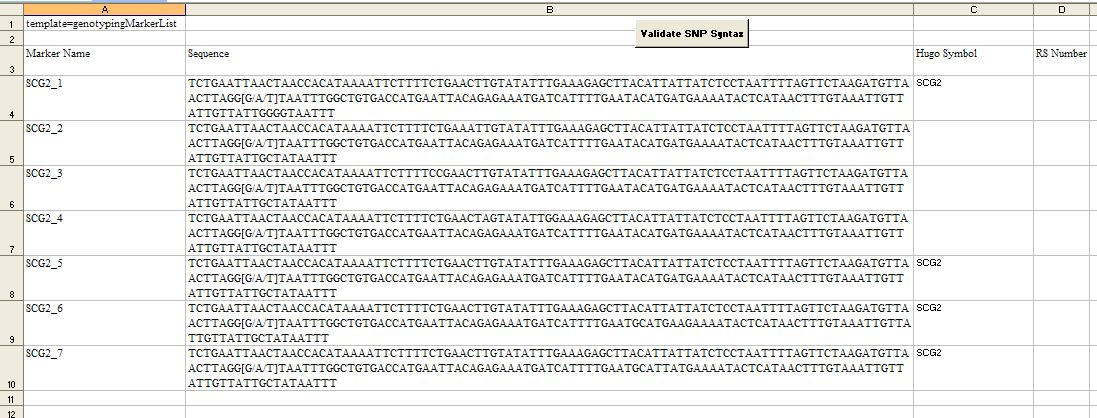
Sample SNPs File Template
- Note: Validation is also run when the file is uploaded. If the Marker Names or Sequences are incorrect, you will not be able to upload the file.
- Do not change/delete the first 3 rows in this template
- Fill in the Marker Names. The names must be EXACTLY the names of the sequences provided for assay design
- Fill in the Sequences
- Fill out any Hugo Symbols and RS Numbers (Optional)
- When you have finished entering your data, click on the Validate SNP Syntax. This will validate the following:
- Marker Name must be unique and can contain only letters, numbers, underscores, hyphens and periods with a maximum of 50 characters
- Sequences must be unique and can have only A, G, T, C and N's and the SNP of interest should be represented as [A/G] or [-/T] or [C/-] or [A/T/C]
- SNP should be flanked by at least 100 bases on either side (If the flank contains more than 100 bases, it will be trimmed down to 100 bases)
- Once validation is complete, save the template as an Excel (xls) file.
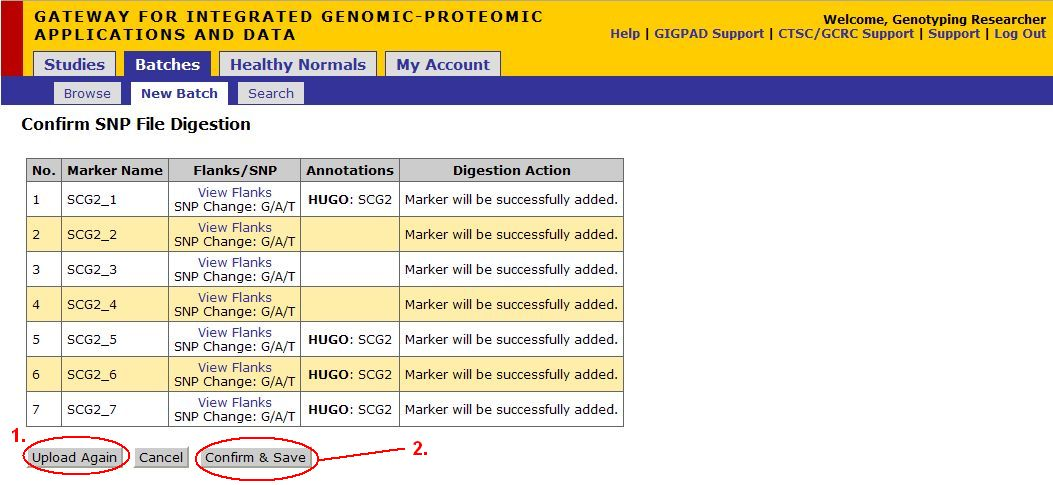
Confirm SNP File Digestion
*Note: If markers with same name are uploaded, then they would have the name appended with date. (MarkerName_mmddyy).
- To upload another SNP file, click Upload Again
- Once you have finished uploading your files. Click on Confirm and Save


