MicroArray Order Entry
Contents
- 1 Setup
- 2 Step 1 of 10: Batch Definition
- 3 Step 2 of 10: Sample Description
- 4 Step 3 of 10: Sample Annotation
- 5 Step 4 of 10: Experiment Groups
- 6 Step 5 of 10: Experiment Comparisons
- 7 Step 6 of 10: Sample Containers
- 8 Step 7 of 10: Select Services
- 9 Step 8 of 10: Billing Information
- 10 Step 9 of 10: Review Order
- 11 Step 10 of 10: Order Confirmation
Setup
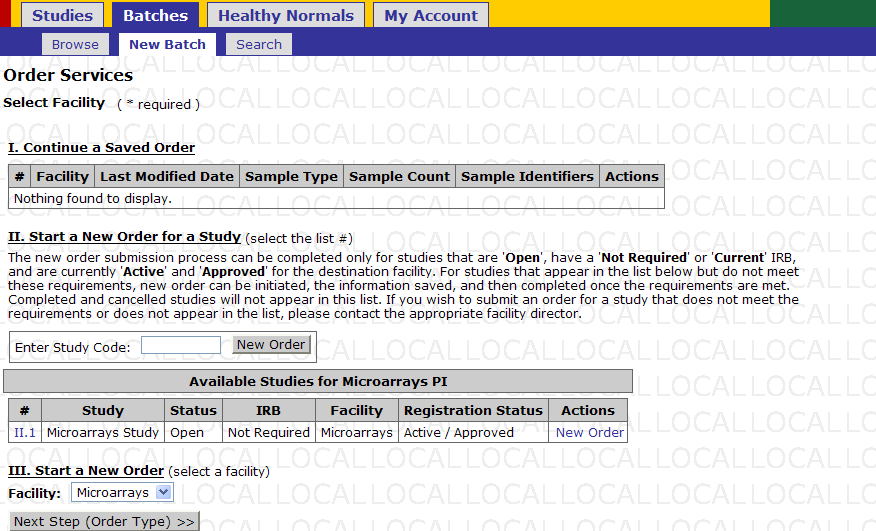
- Navigate to Batches -> New Batch
“Note: Use microarrays facility for requesting Affymetrix and Illumina Services."
- Click on the link “New Order” in the table for the study for which a batch is to be created.
To start a new order that does not have a study, select the facility from the drop down.
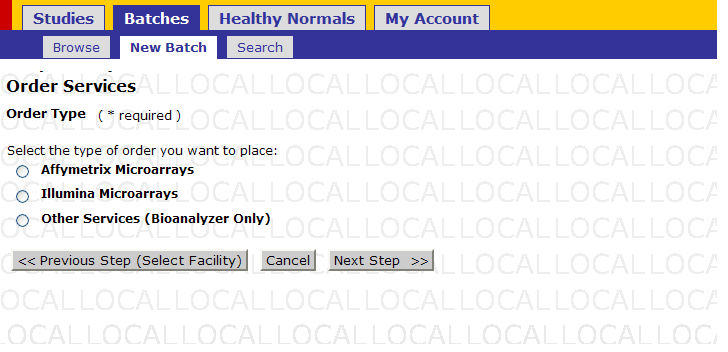
- “Order Services” screen is displayed. Select the type of order to be placed with the help of the radio buttons for the various platforms. Refer Fig 2
- Affymetrix Microarrays
- Illumina Microarrays
- Other Services (Bioanalyzer Only)
For Ordering Services on “Affymetrix Microarrays”, follow the below steps
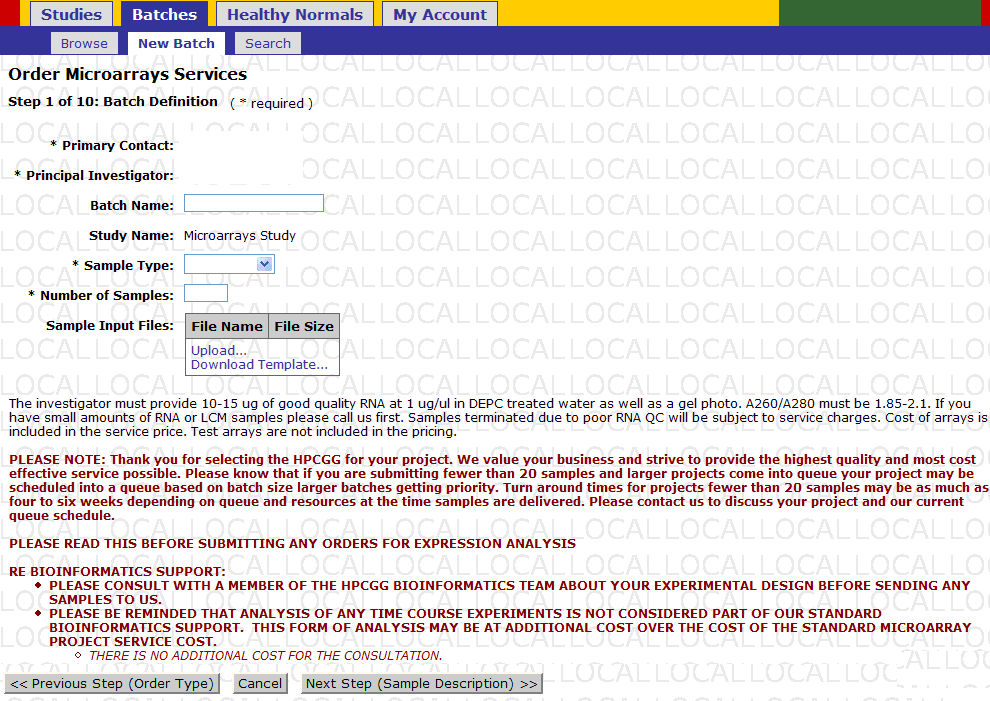
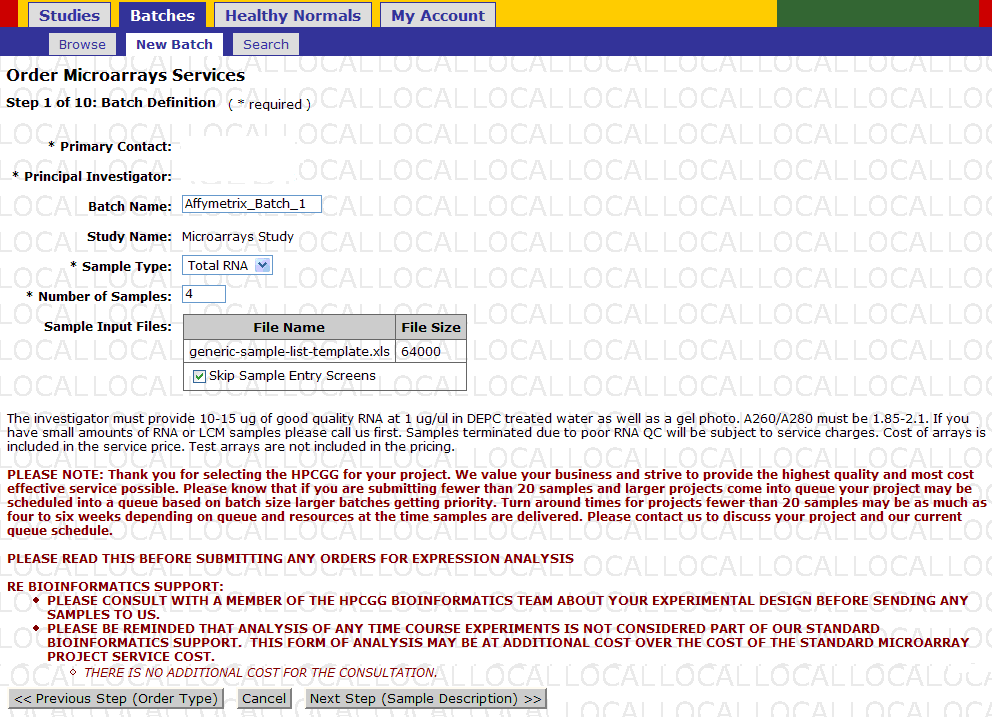
- Provide the batch details in the “Batch Definition” page. Provide the batch name, and Sample Type. Say, Batch Name is “Affymetrix_Batch_1” and Sample Type “is “Total RNA” from the drop-down.
Plate Submission: Click ‘Download Template’ and save the Excel template to your computer.
Step 1 of 10: Batch Definition
- Fill in the details in file. This file illustrates the proper format for the sample data file.
Example samples excel file
- To fill out this excel sheet with information regarding the samples that you will be submitting-
- ‘Sample Identifier’ must be unique. Sample identifier should only contain numbers, letters, dash, underscore, parentheses, period, and space
- ‘Plate Label’ should be the same for all samples being submitted on the same plate. If samples are in tubes, each tube label must be unique.
- Fill in the ‘Well’ column only if you are submitting a plate
- If you wish to add annotation fields you can do so under the ‘Add additional annotation columns here’ heading.
- All Other fields are optional but it is recommended that you take the time to fill out these fields now so that they are pre-filled during the following steps.
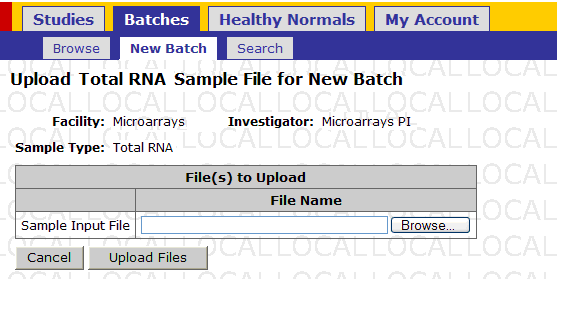
- Return to the GIGPAD browser window and click ‘Upload’.
- Click ‘Browse’, a dialog should appear, navigate to the location where the excel sheet you just created is stored. Select the file.
- Click ‘Upload Files’.
- Once upload is done, the number of samples should appear in the ‘Number of Samples’ text box
- Click on “Next Step (Sample Description)”.
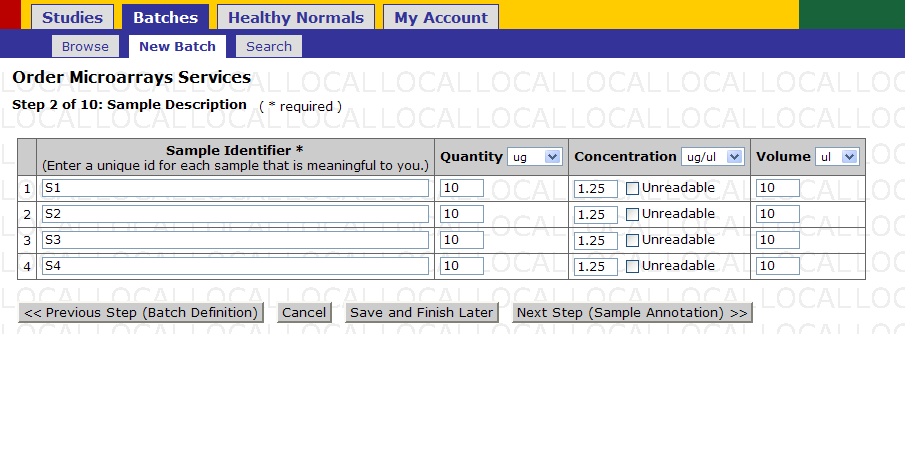
Note: If you filled out the fields in the excel sheet all these fields should be pre-filled. You can edit the values on this screen.
- Edit the sample name.
- Edit quantity values for individual samples or use the drop down to change the unit of measurement.
- Edit concentration values for individual samples or use the drop down to change the unit of measurement.
- Edit volumes for individual samples or use the drop down to change the unit of measurement
- Once data for all samples has been configured to your liking, click ‘Next Step (Sample Annotation)’.
Step 2 of 10: Sample Description
- Provide "Sample Annotation details"
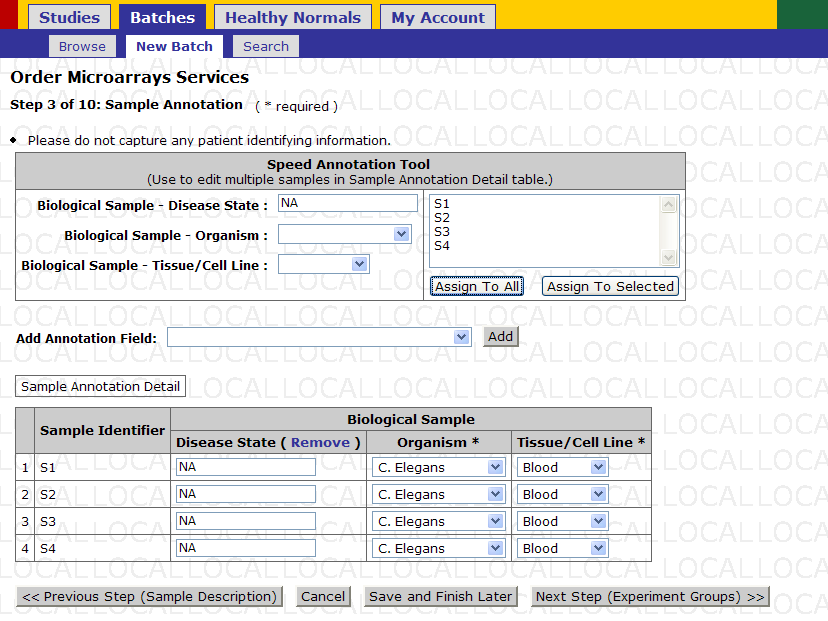
- Use the speed annotation tool to annotate multiple samples at once. Select annotations from the drop down boxes, and then select the samples in the text box, which the annotations should be applied to, and press ‘Assign To Selected’. Or simple press ‘Assign To All’.
- If you require more annotation fields use this drop down. There are default annotations listed. There is also an option for custom annotation fields.
- Annotations can be individually set here.
- Click on “Next Step (Experiment Groups)”
Step 3 of 10: Sample Annotation
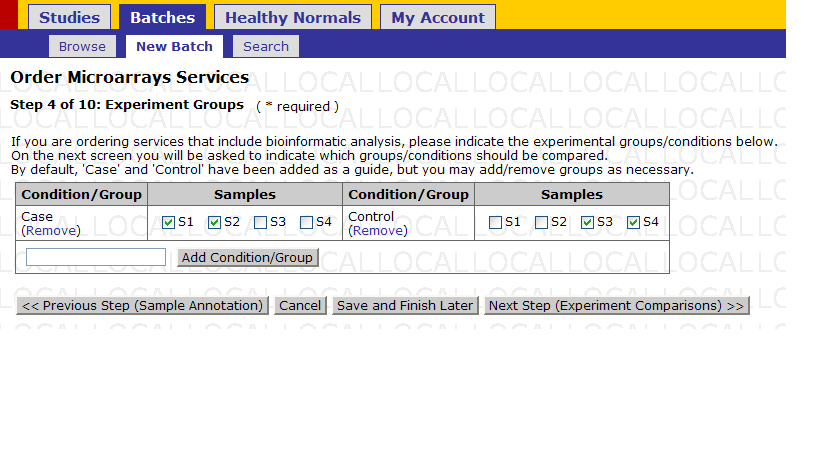
- If your are ordering services that include bioinformatics analysis, select experimental groups/conditions, marking each sample as either a “case” or a “control”.
- Then click “Next Step (Experiment Comparisons)” - and move to the next step.
Step 4 of 10: Experiment Groups
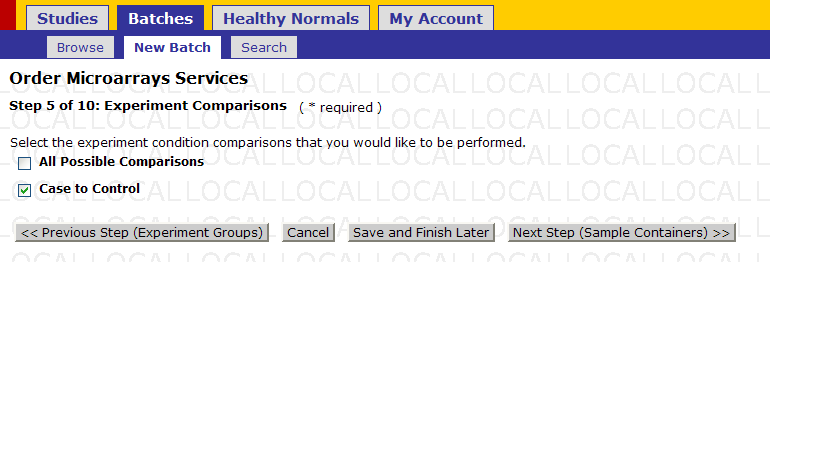
- Select the experiment condition comparisons that you would like performed.
-When complete, click “Next Step (Sample Containers)” to move to the next step.
Step 5 of 10: Experiment Comparisons
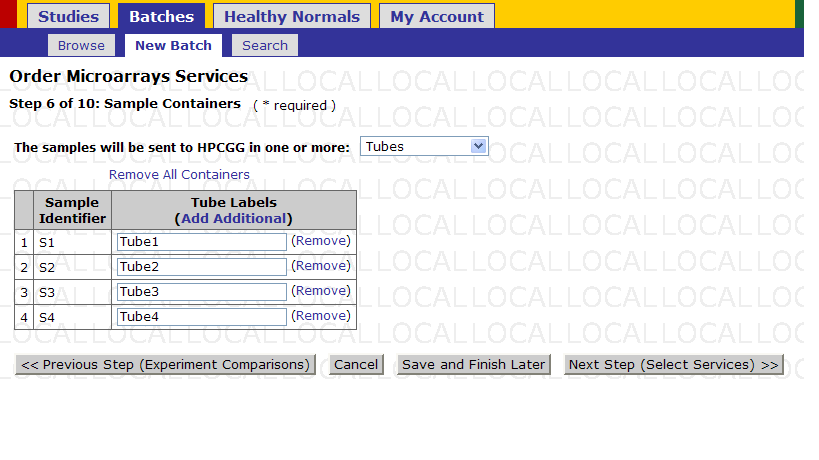
Note: If you filled out the well fields in the excel sheet all these fields should be pre-filled. If you wish, you can use this screen to edit any values.
- Select the way in which samples will be sent the center.
- If you wish to send samples on multiple 384 well plates, enter an name for the plate and click ‘Add’
- You can individually edit sample locations here
- Once you are satisfied with your container configuration click ‘Next Step (Select Services)’.
Step 6 of 10: Sample Containers
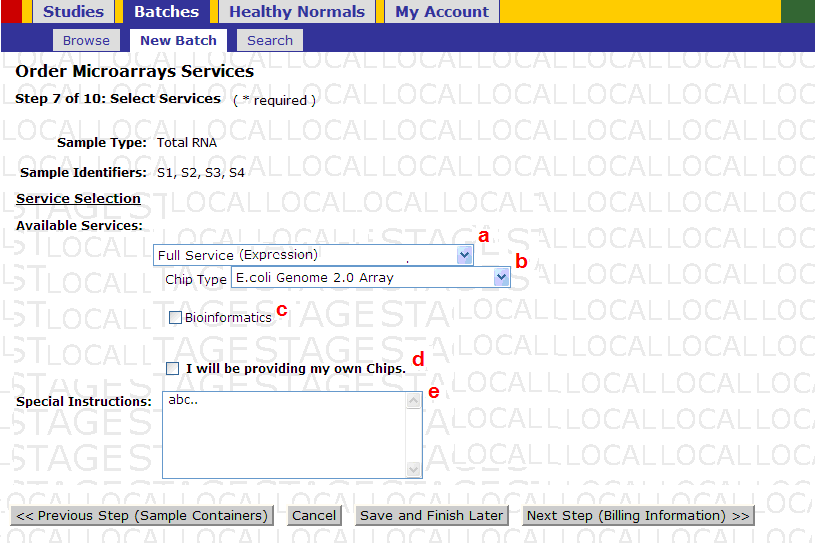
- Provide services details and click on “Next Step (Billing Information)>>”.
Step 7 of 10: Select Services
a. Select appropriate Services from the drop down menus b. Select the Chip or Array type c. Select if you want Amplification service for the ordered samples. d. Check this, if you are sending your own chips. e. Fill in the Special Instructions fields as desired.
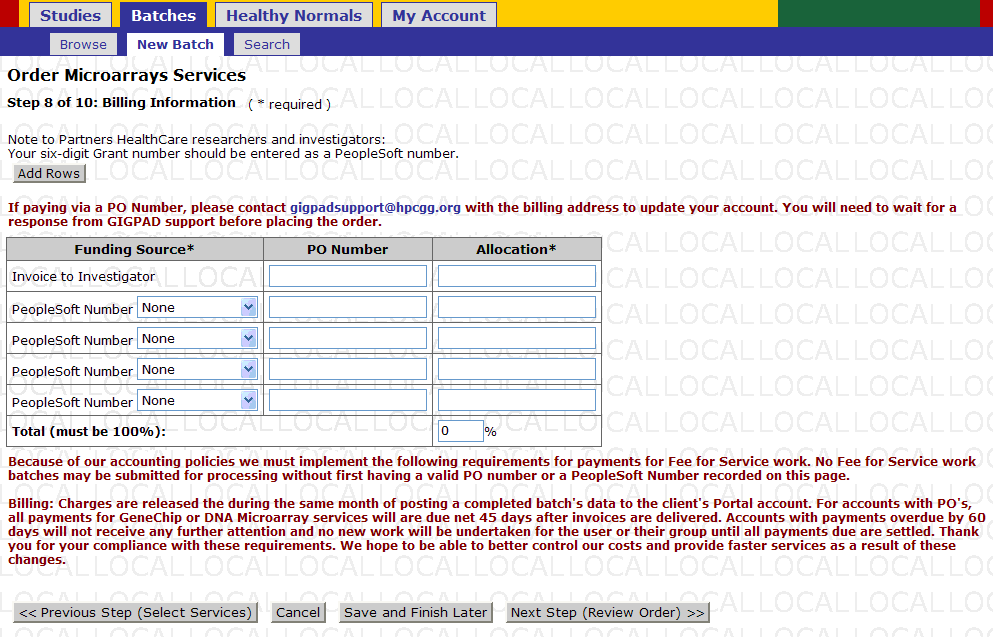
- Provide the “Billing Information” and click on “Next Step (Review Order)>>” to proceed.
- This is an invoice payment option. If you would like to have an invoice sent to the selected recipient, simply enter in a percentage of the total bill you would like to allocate.
- Select the Peoplesoft number you will be billing your services to.
Step 8 of 10: Billing Information
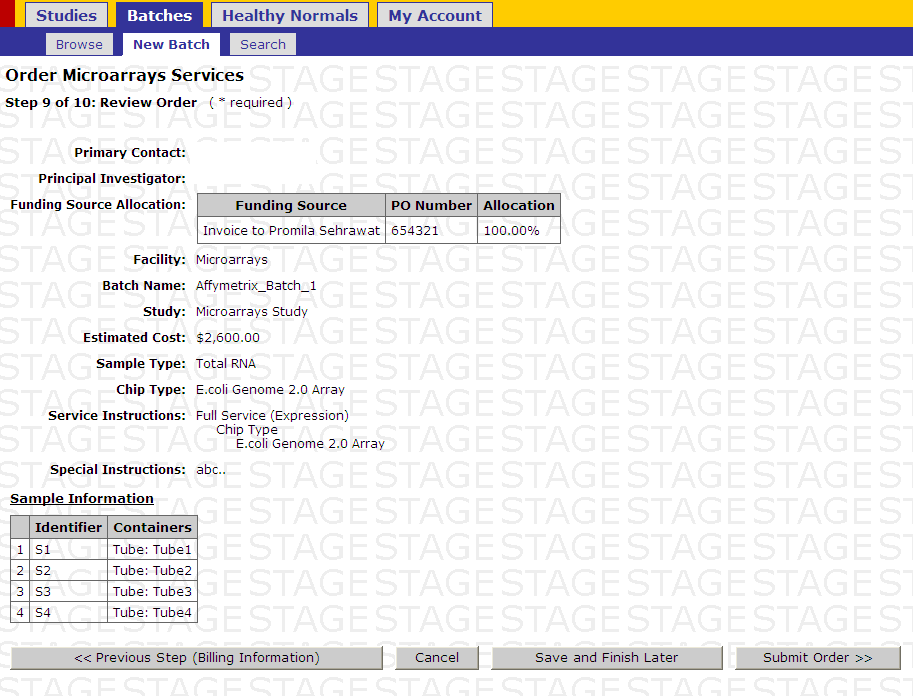
- Review your order. If you are satisfied with your order click ‘Submit’ otherwise the ‘Previous’ button to go back and edit your order. Or use ‘Save and Finish Later’ to return to your order at a later time (Your order will be saved in the browse window).
- Click on “Submit Order>>” for order submission.
Step 9 of 10: Review Order
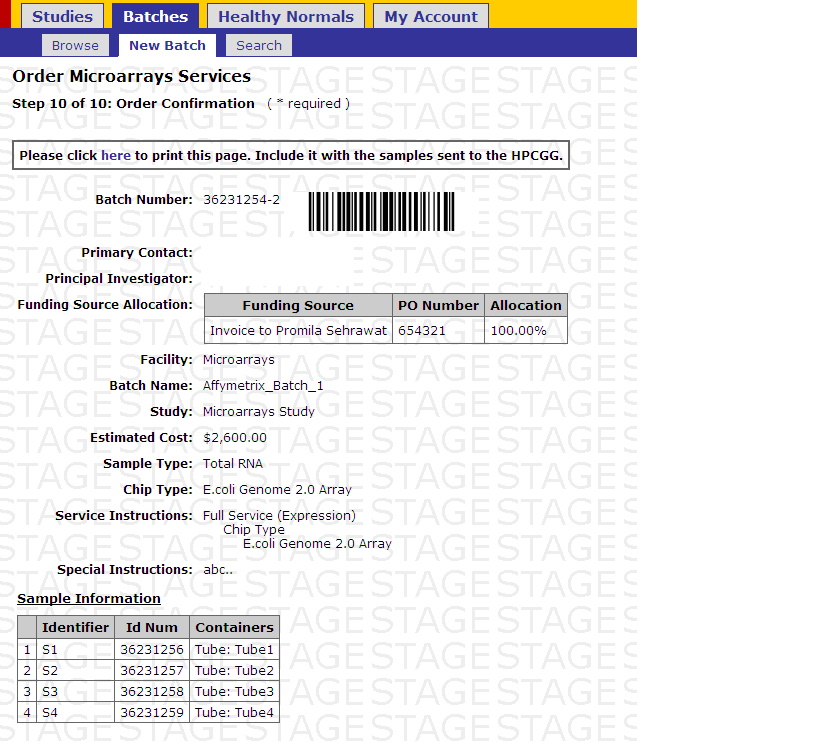
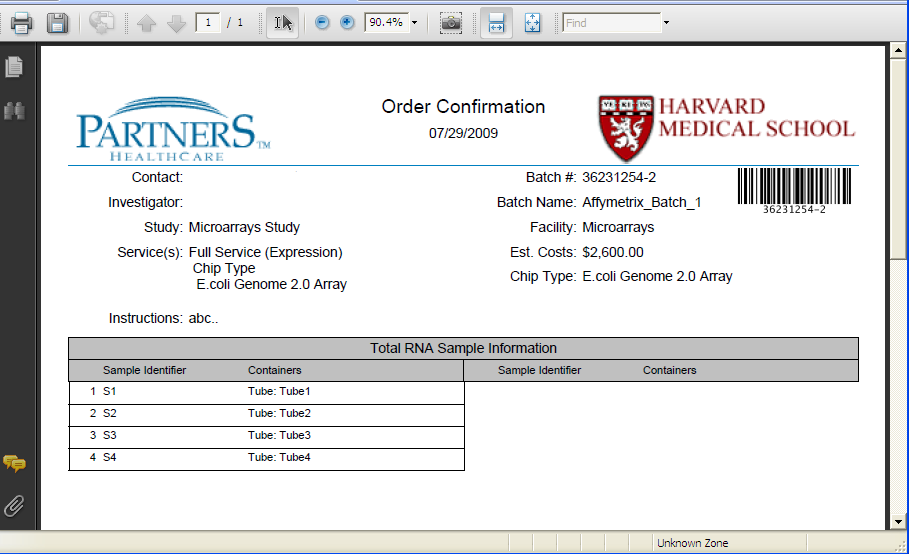
- Click on the link “here”, to generate a printer-friendly version of the order confirmation.
Step 10 of 10: Order Confirmation
- Print the order confirmation
